Starting Up
Now I had the NXT software installed, it was time to fire it up. I was expecting an all singing, all dancing presentation as was the case with the RCX Robot Invention System and Mars Mission software, but those kind of intro movies seem to have withered away. They did add an element of excitement to Lego toys though. This instead fires up a rather good looking interface, which has a rounded, flattened and simplistic style reminiscent of LCARS (the Star Trek UI).
Time to click the “Getting started” button. The software rapidly runs through a little presentation demo, and tells me I can now connect my NXT to download a program. I plug it in, turn it on connected and Windows detects it. I then click the next button on the presentation, already a step ahead - as usual, jumping the gun. It then tells me to plug in the cable, already ahead.
The presentation goes through uploading the program and tells me now to press enter four times to take me to the Demo program. I give it a go and realise it has not actually uploaded anything, just shown me a movie…
Okay…So I go back, and actually try it out as the presentation suggests with the interface - which dismisses the presentation. Wait a minute! I want to try it out, right now, but I want to be able to go back. Actually, it is fairly simple. There is a tabbing interface. The thing is, this initial tab is indicated only with a single icon, so it looks like it should do something else. All the program tabs have the program names. Anyone using Firefox will soon find their way around the tabs.

I start programming with a drag and drop, push the download button, press the orange button on the NXT four times, and I hear the sound “Good Job”.
I will have to play with the NXT-G drag and drop interface for a while, and see what it is really capable of, but I will probably be throwing a C compiler or Lejos on it so I can port old familiar algorithms to the NXT.
Time to go start on the robo centre. I click on the Tribot and click through, noting that the paper instructions are shown in a small window pane on the screen. The pane is not expandable via dragging, but there is a zoom button. I am glad there were paper instructions - it is not that easy to see on my small laptop screen, and I can move much faster with the paper ones. I Note that there is an artefact at the end of the digital instructions that you will need to test with - which is available on the paper ones on page 60 of the User Guide.
I built the ball holder, needed for trying out the next few things, it is on page 60 of the User Guide, or at the end of the digital tribot instructions.
New Lego Technic Parts

When building this I noticed this new piece, a rubber part with two axle holes, the 45590 - Technic Axle Joiner Double Flexible according to Peeron. This may be handy if motor vibrations interfere with the Ultrasonic sensor.
First Program
Time to create the first program, okay not quite the first, but I am not sure I count the “Well Done” demo. This basically went forward and back. After downloading it - the robot seems to veer immediately to its left. I remove my added Ultrasonic sensor ( Last blog post - I jumped the gun again), tried again in case that was the cause. It is returning to the same spot, but at a different angle.
I try it on 5 seconds off the pad- and the veer does not seem to be an issue. I weight down the pad - and it returns fine - it seems that on the laminate floor, the pad is kicked away at an angle as the robot sets off. My advice is to weigh it down with something so it doesn’t slip around.
Okay- 2.3 seconds forward and back isn’t that exciting… It is also this point which I notice that it does not self power down… I try to find the NXT settings in the UI in Windows and cannot see it - but there is a settings menu on the brick itself. For now - 2 minutes of inactivity will do fine.
Adding a touch sensor
The next build is a touch sensor for the bot. One other thing I have noticed with this set, is that the axles seem to put up much more resistance than they do in my older sets.
The routing instructions in step 6 of the Tribot Touch sensor are a bit useless both on screen and on paper (step 23, page 53) - note that it actually intersects geometry at the front of the diagram. I had a bit of fun there trying to find a place that would not stress the non-booted RJ connectors, and also not crimp the cables or stress liftarms by placing them under things. These larger leads are a bit awkward.
The program worked well, but not without flicking the block a little way from its spot as it reversed - a bit of a kick. Not a lot I can do about that at this point.
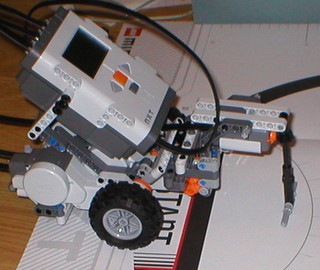
Time for the grabber - when things start getting interesting…
Further ideas
I have been inspired a lot by playing with this, and cooked up a few ideas.
- Trebuchet - Ultrasonic/sound activated - build a trebuchet that fires when it hears a sound or detects something close enough with the ultrasonic sensor.
- Line follower bot - build a line following robot using the NXT and the light sensor.
Links
- OrionRobots gets our first NXT
- Lego
- Mindstorms
- NXT
- Timephiz - Mindstorms NXT Test Run - A blog from a teacher going through a similar experience as I.