Since I have written plenty on the Lego RCX, I have decided to distil the many different articles into one article in one place.
This contains info on programming an RCX, buying a Mindstorms Kit, adding your own sensors and powered devices, opening the RCX up, getting the RIS software and IR tower working on newer OS’s and I will be collecting up and adding more in the next few weeks.
Collected Details For Using The Lego RCX
The Lego RCX is a superb microcontroller, genre defining- and this is all about the amazing things you can do with the device and building awesome stuff (like robots!) with Lego. Find out here to get up close and inside the RCX.
Included is some basic info on the RCX device - what it looks like, what kits the RCX was part of, and why I think Lego Mindstorms was genre defining. Also is information on programming and my personal favourite way to program the RCX.
I have included information on opening up the RCX so you can get inside it and see what makes it tick - this can serve either as clear instructions on taking a look and putting your RCX back together, or taking a look at the closeups and chip identifications to save you having to butcher your own RCX. Since they have become rare, there is some info and links to places to buy an RCX so you can reproduce the experiments here and generally have fun playing with it.
On the more advanced side here, there are circuit diagrams for interfacing with the RCX for getting power from both motor and sensor ports, and also for building active sensors. Finally there are links to other sites and books with a great deal more information to get the best out of this cool toy.
Although the RCX is dated, succeeded by the NXT, this Mindstorms gadget can be remembered as one of the great things created by Lego.
Lego RCX Basic Details

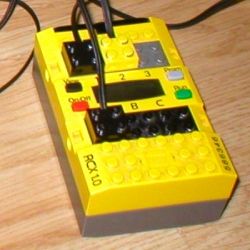
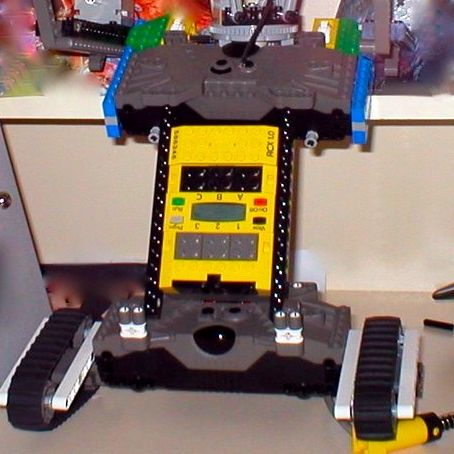
The RCX (Robot Command eXplorer) is a Lego computer, capable of controlling 3 Motors, or more with some tricks, and respond to inputs from a 3 or more sensors.
The version 1.0 RCX has Lego part number 884u and houses a Hitachi H8 microcontroller.
The RCX comes as part of the Robot Inventor Sets (RIS 1.0, 1.5 and 2.0), which included an IR computer connection (9-pin Serial or USB), many Technic building bricks, motors, sensors, robot building instructions, a test mat and full windows Mindstorms software to program it.
The RCX was also sold in multiple packs as Lego DACTA sets intending the RCX for use in classrooms.
The V1.0 came with an external 9v power jack, that was later ditched. I have seen this used with other kinds of battery packs – thus allowing the bottom panel to be empty. This can lead to better even distribution of weight and other advantages.
In addition to the default programming language, XCode, the RCX could be programmed with Robolab (provided by Lego for DACTA users), NQC, Lejos and other hobbyist languages.
Lego RCX Books and Gear
The Lego RCX is no longer available, but there are many books on the subject worth reading, as well as accessories, and even some to allow the newer NXT controller to be used with kit from the RCX generation.
(paid links)

Classic Lego Mindstorms Projects and Software Tools: Award-Winning Designs from Master Builders
Stacked with ideas to get more from an RCX kit with concepts that translate to later revisions and other Lego kits.
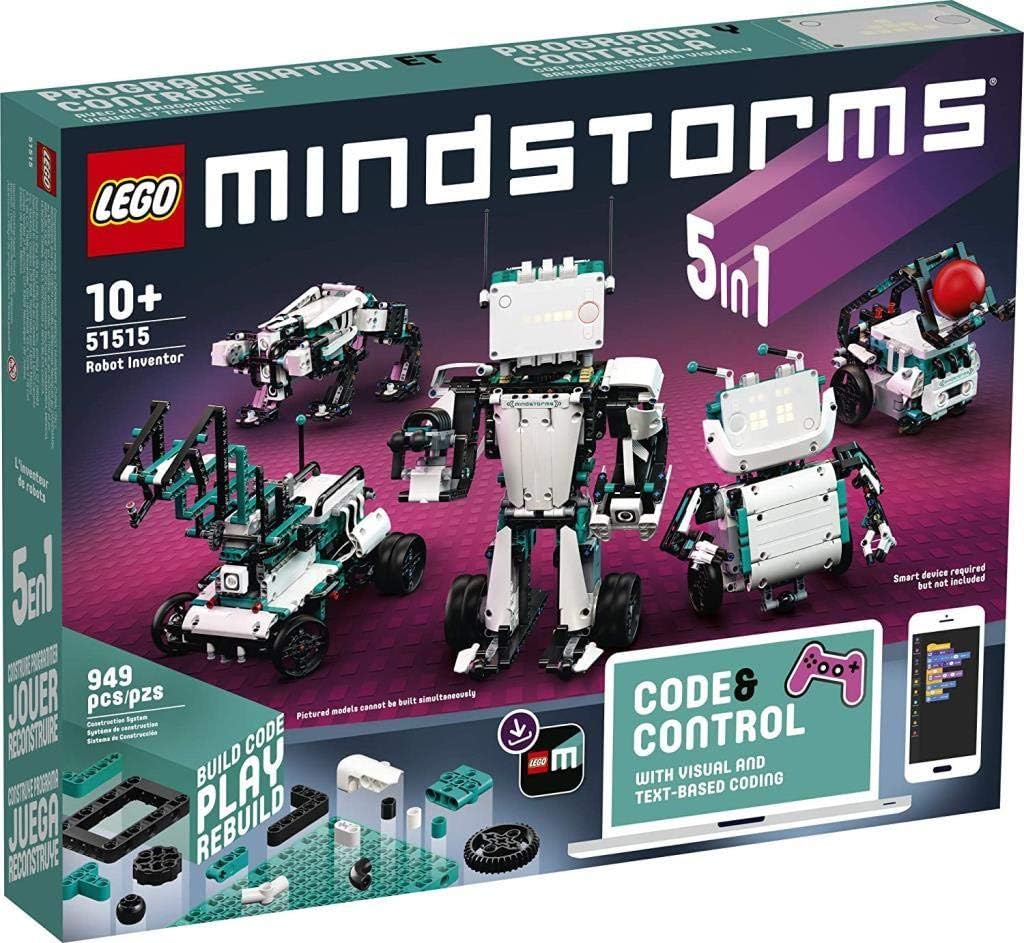
LEGO 51515 MINDSTORMS Robot Inventor Robotics Kit, Coding Set for Kids, 5in1 App Remote Control Programmable Interactive Toy
This is the current generation in awesome Lego robot and contraption building kits. This toy comes with 4 smart motors, an LED screen, speaker for sounds, a distance sensor, colour sensor, 6 axis gyroscope (orientation sensor). Your imagination is the only limit. Build a robot with Lego, and program it with blocks or MicroPython. As it’s Lego, you can extend it with any other bricks from the Lego system.
NQC - Not Quite C - is a C-like language for programming the RCX. It is a great way to get started with the RCX, and is a good way to learn C programming. NQC is a free download, and is available for Windows, Linux and Mac OS X.
LeJOS - A Java based Lego RCX System
LeJOS is available on both the RCX and NXT, with some differences in capability. LeJOS is a TinyVM based Java programming language and API for the RCX. LeJOS is well documented, and has been used a great deal.
Here is an example of some simple LeJOS code:
    import josx.platform.rcx.Motor;
    import java.lang.Thread;

    public class SimpleBot {
        public static void main() {
            Motor.A.setPower(3);
            Motor.A.forward();
            Thread.sleep(1000);
            Motor.A.stop();
        }
    }
This would cause motor A to start at power 3, go forward for 1 second, then stop.
I would recommend you start with The LeJOS Tutorial. For those who already know Java, follow the start of the tutorial to get LeJOS installed and uploading to your RCX, then skip to the API documentation.
Low friction RCX rotation sensor
A simple way to build an additional RCX sensor from existing kit parts
The RCX has an optional rotation sensor that could be bought for it, but they are now fairly difficult to get hold of. They also used a brushed contact based system for sensing, so could be prone to wear and introduce friction into your drive chain. On the positive side, the RCX could have its sensor ports set into a mode that would automatically count the revolutions based on the sensors encoding.
I investigated ways to make a friction free sensor, and while my method requires a little more programming than using the rotation sensor, this idea also has the benefit of being able to be constructed from parts shipped with the Robotic Invention System (the basic RCX kit).
The animation below shows the basic construction, which can be altered to suit your model, but the important thing is that the light sensor is close to a pulley wheel, with light and dark round studs pressed into the pulley wheel to give a readable pattern to show rotation.
Classic Lego Mindstorms on eBay
Lego is expensive, and older rare Lego, like the original Mindstorms kits are hard to come by. Ebay has been a great source of older Lego sets for me - Lego themselves only stock their current season, which they rotate all the time.
Sets to look out for on eBay - first is the RIS - The Robotic Invention System - the kit that features the RCX and gets you started on robot building in Lego - many other kits are expansions to this. The NXT - this is the NeXT generation Lego robotic system - far more capable, but arguably harder to use, partially because of the studless construction system. The Mars Rover expansion set - this is good fun, and has many extra elements. Another really amazing find is a Cybermaster kit - an RF based programmable brick which also comes with one of those brilliant Technic figures.
The Explorer and Droid developer kits I think are not so interesting, as they are not at all as capable as the RCX, NXT and Cybermaster. The Technic Control centre (the kit with many motors and a big control deck with lots of buttons and a record/playback system) is good fun, but is possibly going a little too far back in Lego robotics. The bar code based “CodePilot” was innovative, but also very limited.
Top find - a complete, even better MISB (mint in sealed box) RIS 1.0 set.
The RCX Specifications
The Lego specifications first
Its part number is 586346. There are two types of version 1- one with, and one without an external DC power input. The DC power input was a useful expansion.
| Specification | Value |
|---|---|
| Max Length | 12 Studs (Approx 95mm) |
| Max Width | 8 Studs (Approx 63mm) |
| Max Height | 4 Bricks/12 plates/40 mm(including top studs) |
| Weight(with Batts) | Approx 250g |
It uses 6 AA batteries – with a combined voltage output of 9v.
It has three input(sensor) pads, and three output motor pads – all using the Lego stud type connector.
It has an LCD display, capable of displaying 5 digits(with a little walking man between them).
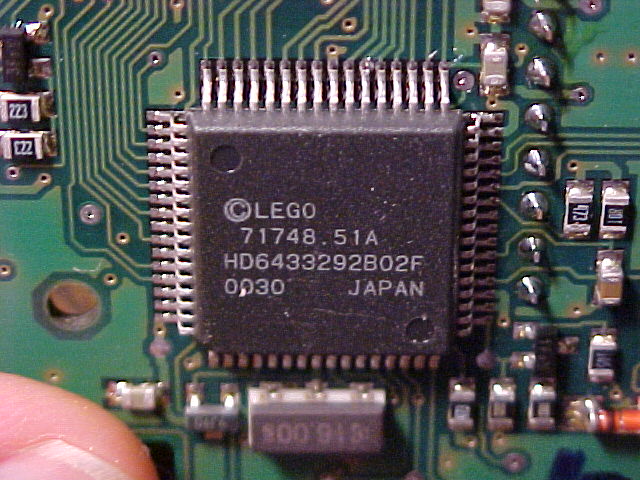
Internally the RCX uses a Hitachi “H8/3292″ MicroController.
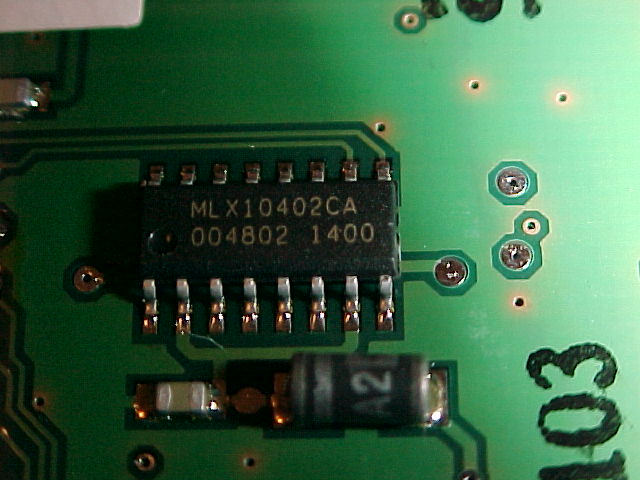
The output ports can output 9v, and use PWM techniques to control motors speeds. The RCX motor ports do not adjust the actual voltage output – so take this into account when driving circuits from these ports.
The RCX uses three MLX10402CA motor controller chips(one for each port).
Inside The RCX
Photos of The Innards
Lego RCX - The Genre Defining Robot Toy
This Kit Changed the Game
The RCX was truly genre defining. Although there were robotic controllers available before, even those that interfaced with construction toys, this was an accessible, easily programmable, versatile controller. The RCX came with all the kit needed to build quite sophisticated robots, wheels, gears, axles. It also came with all the programming software and leads needed (often an extra for other kits).
The RCX came with plenty of information and instructions and the software was not a dry language IDE, but a full interactive introduction to the kit. The RCX and Mindstorms was available to the consumer as well as schools, at a reasonably affordable price. Mindstorms has an online community maintained by Lego, and made it easy to become a member of the community.
Designs and programs are still being swapped now. It was the RIS - Robotic Invention System kit, and the accessory or lightweight kits like the Droid developer kit, the Mars Mission kit, Vision Command (which included a web cam and computer vision software), that started a new glut of hobby robotics. The introduction of the Mindstorms system hit a few years before robot wars, and resulted in things like the “Real Robot Magazine”. Other toys started to catch on, but still, none have the versatility or accessibility that the Lego ones do.
The Lego RCX, combined with the Lego Robotics Construction Kit that it was sold with in retail, brought many people who had though they had grown out of Lego back to buying and using Lego. Mindstorms also brought many others into building robotics.
The RCX has been used in schools and extra-curricular children’s clubs, including one I ran myself from 2004 to 2005. Mindstorms can be used to teach children engineering principles, mechanical concepts, control engineering and programming, about the use of sensors and motors and many other useful lessons. Lego is also great fun to tinker with.
Opening An RCX
If you are very technically minded, as I am, you may be the sort that would like to open an RCX, just see what is inside it. I have provided plenty of information to help you get a lot from the RCX without needing to, but sometimes if you have that itch, you just have to try having a look inside.
I will start by making it clear that this is not something you want to do unless you really know what you are doing. If you do try this – I can offer no warranties for broken or non-working RCX’s as a result.
This said – there may be benefits from this. First – you can get a better idea of the innards of the beast. Secondly – you may wish to wire the RCX to an external power source, or use mindstorms to power other devices, although the better method for this is to make a simple battery box insert with a notch for the first, and use a brick style connector for the latter.
If you are really determined to disassemble your RCX, please read the safety guide and continue. Please note that after doing this you will need to re-flash the firmware and upload your programs again.
Safety Requirements
You will be prying the plastic case of the RCX open, so please wear goggles as things may ping up at your face while doing this. Please work in a well lit desk area – this will minimize your chances of breaking something, loosing something, or injuring yourself with a prying tool. The voltages in the RCX are low, and you will remove the batteries, so there are no special considerations needed there. That said, you may wish to wear an anti static band to reduce your the low chance that you might fry the circuits on board.
Tools and Items recommended For Opening The RCX
These items will help you to open up and look inside an RCX. Make sure you don’t skimp on the tools, or the safety gear.
(paid links)
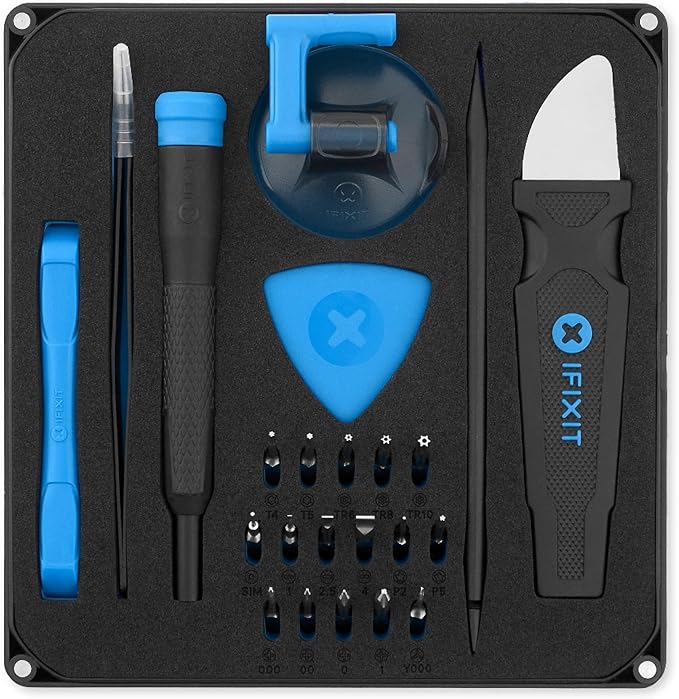
iFixit Essential Electronics Toolkit, Basic tool-set with 16 precision bits (4 mm), magnetic screwdriver & opening tools for electronic devices
This kit contains a lot of the tools you’ll need to get the RCX open.
The spudger and flat blade are perfect for levering the case open to get to screws inside.
There are some very fiddly screws when opening devices like this, nice you’ve levered off the case. So a small set of screwdriver heads for these is also useful.
The tweezers are helpful for getting screws back in later too. We like the iFixit tool quality, and their mission in helping people fix and maintain their own devices.

DeWALT Safety Goggles DPG82-11D
As you pull things like this apart, tiny plastic bits can sometimes ping off, and if you are unlucky, you may get one in the eye - ouch! A reasonable pair of goggles is highly recommended when getting into the innards of any gadgets- because for the extra time, money and inconvenience, none of them outweigh the value of your eyes.
These DeWalt goggles come from a well known brand, and are designed to keep your view clear, because foggy goggles end up over you head and not over your eyes! They are scratch resistant and designed for comfort.

A positionable desk lamp
A good lamp makes working with these things far easier - otherwise you find yourself holding it closely to your eyes and angling it to the light just to find something. With a good light - you just wont need that. A good thing too - as poor lighting may lead to you taking of goggles as you pry at the fiddly parts. Get a good desk lamp!

An Antistatic Wrist Strap
While some recommend this, as your contact may cause some devices to malfunction, I rarely, if ever use a wrist strap. You may be carrying a charge - especially if you are wearing woolly jumpers or other static build clothes. However, instead of a strap, tapping on an earthed device may be just as useful.
Steps
First you will need to remove the battery box, and all batteries.
Then lift one side of the battery holder carefully, and observe two slots, using a fine flat head screwdriver(or jewellers screwdriver) – insert into one of the slots, keeping the cover face down, and click the PCB off the clip holding that PCB to the yellow front cover. Repeat on the other side. These clips connect the PCB to the input/output pads so do not damage these.
Keep the RCX face down – so stuff like the pads and buttons do not fall out. At this point, you should have a PCB clipped to the battery holder. There are clips keeping the two together – which can be undone by rotating the PCB carefully clockwise, and sliding the PCB out from these.
To reassemble – follow the same steps backwards. You may need to lightly bend the power clips down before popping the board back into place.
Details on the Hitachi H8
The Hitachi H8 (now Renesas) is the microcontroller serving as the main processor on board the RCX. NQC is one way of compiling code for the H8.
Specifications:
| Spec | Value |
|---|---|
| Lego Chip Exact Name | HD6433292VF10 |
| Clock Speed | 10Mhz |
| ROM | Mask ROM (As opposed to a PROM ) |
| Internal ROM | 16 kb |
| Internal RAM | 512 bytes |
| Registers | 8 16-bit or 16 8-bit |
| Package | 64-Pin QFP (FP-64A) |
The H8 operates in three modes, The three modes are:
| Mode 1 | Expanded Mode with on-chip ROM disabled | | Mode 2 | Expanded Mode with on-chip ROM enabled | | Mode 3 | Single-chip mode |
Getting Hold of an RCX on Ebay
The RCX is quite hard to find, especially at a good price, and while the more recent NXT has a lot to offer, this is still a classic kit. Especially if you like to do Lego robotics but with classic studded Technic beam construction. It is worth asking a seller if the RCX can come with a DOA guarantee so you will get RCX in working order.
Look for listings that show a display on the LCD. Beware that the original CD’s are almost certainly not going to work with a modern PC, so you are probably expecting to use NQC or an alternative firmware.
Beware that motors, and the motor driver chips on an RCX can both not be working. When you get your RCX, try making sure each motor port goes in both directions, to try each motor, and then validate the sensors and sensor ports too.
This should also mean having tried the IR tower and connection to the RCX - which can also fail.
What is Lego Dacta?

Now known as Lego Education, Lego DACTA is the School consortium branch of the Lego company. Dacta Lego is sold through a number of outlets, and some of the older kits may be available via Bricklink or eBay.
The Dacta range includes some excellent robot building kits- including multiple Lego RCX kits, and Robolab software, as well as specialist stuff like the Lego energy centre “eLab” including the Lego Solar Panel. There is an up-to-date range now for the NXT and Power Functions sets.
A number of UK Redistributors are prepared to sell this to hobbyists and small Lego clubs or groups. Lego Education is also a good way to get bulk sets.
Getting Power From an RCX Sensor Port
This is an advanced section for people attempting to make their own custom accessories for the motor ports.
When powering some devices from the port that are not motors, you may require a smooth current that is not pulsed
Normal operation of the RCX motor ports produces a PWM – Pulse Width Modulated signal, where the power is turned off many times a second, and it is the ratio of on power to off power that will determine the speed of a motor. This signal is not suitable for more sensitive electronic devices.Also, as the Lego connectors are multi-way, you will want to rectify the signal for a circuit that will only take power one way
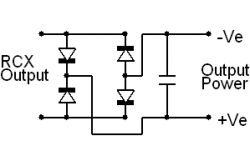
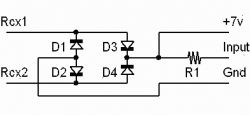
A circuit is required to smooth and rectify this signal
This can be done in a simple way by using a diode bridge to enforce the polarity, and a capacitor to smooth the output. This will give an almost constant voltage. There will be some ripples
The diodes will drop the voltage by about 0.6v each
By setting the output on full, you can leave out the capacitor – but this still means at any orientation you will have two diodes in series, one at at the positive and negative terminals for your circuit, so you will have a current drop of around 1.2v – and end up with a total output of 7.8v
The circuit diagram is simple, and used with a Lego connector will allow you to use the circuit and your devices with the RCX and also the Cybermaster kits.
Building a Powered Sensor For The Lego RCX
This advanced technique allows you to build custom sensors that require power.
The RCX supports two modes of sensor, passive sensors, which allow simple devices like switches and resistors, or active sensors. Active sensors can draw power and return a signal.
This active mode drives the sensor port in a cycle, where one part of the cycle is power, and the other part of the cycle is used to read from the sensor.
You can either use this to drive your own sensors, or power other devices. Note that the output current here is pretty low at only around 50mA. Also you will only get around 7v with this circuit. This is more than enough for a number of recent electronic devices where 5v can power them.
D1 to D4 should generally be low power diodes – such as the 1N4148.
Changing R1 will change the characteristic of the output curve from any connected sensor. Recommended resistances are 1k, 2.2k or 4.7k.
Getting The RCX Software Running On Newer Machines
This section will need to be retested and updated as Windows moves. It’s not always possible to run old programs on modern computers.
Computers are now running Windows 10. The Lego Mindstorms software for the RCX with the original Robotics Invention System is now nearly 20 (as of 2018) years old and will not always run on them. With a little perseverance, and a few patches, there are many ways to get the RCX working.
It is one thing to get the RCX running with the likes of NQC and Lejos, but the original experience is fun and inspiring still with the original CD and its presentations. The original software not only requires somewhat dated driver interfaces, but also an old version of flash, in some areas that are no longer backwards compatible.
The first way is to consider using Virtual Box. This allows you to forward USB ports and serial ports to a virtual machine, in which you can then run an older version of Windows and then run the original Mindstorms disks as is.
You may get somewhere in using an older version of Quicktime to prevent errors in the default software. The exact version needed is 6.5.2 for the RIS 2.0 software (the most recent).
Virtual Box is freely downloadable at Virtualbox.org. You will just need a version of Windows – I recommend 98 (which dates the RCX!) as there are no patches needed for the Mindstorms software. Just make sure you use the Windows 98 VM only for Mindstorms and do not go on the net with Windows 98.
In Windows 7, with the more expensive editions (which you can purchase through an Anytime upgrade), you get a version of Virtual PC, with an older version of Windows running in it, for just this kind of compatibility problem. However that is XP, and the compatibility patches that Lego were hosting have long since been removed.
Unfortunately, Lego do not support the consumer RCX so much any more, and the downloads have now also gone from their education site.
For a simpler route in terms of drivers and so on, you may find NQC and Brickx Command Centre easier, although programming them takes more work and patience.
More RCX, Mindstorms and Lego Information
While there is plenty here about interfacing with the RCX and what is inside it, there are also many good sites and discussions on the internet about this genre defining device.
You are welcome to send me your own Lego Mindstorms Robotics site here as long as the content is relevant to this page.
- RCX Internals
- RCX 1.0 Case Disassembly - iFixit
- Bricklink Catalog Entries for the RCX
- Lego Specifications - When interfacing stuff with Lego, knowing conversions to MM from the Lego Units can be very handy.
- My Lego only blog