So throughout my build, I’ve been repeatedly thinking of a feedback system for the robot. Since I cannot rely on Wifi - and it’d be inconvenient even if I could, I’m not going to connect a terminal to my robot and monitor it from a PC. So therefore, the robot needs to have other ways to tell me what it’s doing.
What information do I need?
- Modes - in Piwars - there is a mode where it’s manually being driven, and modes where it is autonomous for different challenges. I need a way of showing the current mode. What’s more - this should hook up with the remote in some way to select them.
- Debug - some way of telling me what it’s doing - like sensor info - bar graphs, or other visual notes on that. Direction it is trying to go in. Lost contact with pad.
And It could be used for other stuff - like being cute.
Contenders
First up is the Microview - an Arduino based microcontroller with a built in OLED display. Next are simple LED’s. Next are the various Neopixel types. There are at least 3 I’m interested in for this - a panel, the Jewel types and the strips.
Microview Pros and Cons
The Microview is a small Arduino 328 based microcontroller with a built in LED display, along with IO pins for controlling and sensing. It has a programmer board with a USB interface for programming from a computer.

Pros
- It’s able to display words and complicated pictures - it has fonts, and high level things for graphics and drawing.
- It’s high resolution.
- It’s very bright.
- It could be used to interface with additional devices.
- I already have 4 of them.
Cons
- It’s very small.
- Outside of the breadboard scenario - it may be a bit annoying to mount.
- I’d need to write code that runs only on the Microview and make the Pi talk to that code.
- It comes in only 1 colour.
Neutral points for consideration
- What is it’s power consumption?
- It could be plugged in as an I2c device, serial device or USB. Or any other Arduino protocol.
Simple LED’s
What about a bunch of just LED’s, maybe even a grid of them? Connect to IO pins. This can include the single coloured type, or the non-addressable RGB type.
Pros
- Very simple to think about and interface.
- not that hard to mount anywhere.
- I have lots of them.
Cons
- With these, unless I go for multiplexing or charlieplexing them, I will mostly have 1 per Raspberry pi pin.
- They will need a resistor each.
- Very low resolution - probably only a few LED’s here and there.
An interesting variant of this are the LED noodles, which could be huge fun as Tron like trim around robots.
Neopixels and RGB Addressable LED’s
This is a class of displays - which have a set of common pro’s and cons, then some for each format. The defining features of them is that they are colourful, daisy-chainable LED configurations, with the ability to set he colour of each LED individually.

Common pro’s and cons
These pro’s and con’s apply to all variations of addressable RGB LED arrangements.
Pros
- They can be daisy chained.
- They are RGB coloured.
- Once signalled - they will hold the colours on them.
- They are setup to separate power for the lights from power for the controller.
- I already have a few reels.
- Available everywhere.
Cons
- They are slightly interesting to signal to. Many controllers can do this though.
- They cannot display much in text without using the large panels.
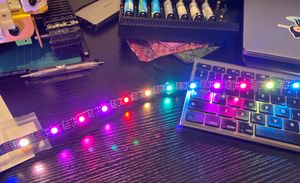
Neopixel Strips pros and Cons
There are strips that come on reels, and strips that also come in rigid bar form. These are very adaptable.
Pros
- These can be mounted directly into a frame, or around the outside of the robot.
- Larson scanner
- Could be directional to show more direct sensor readouts.
- Could be arranged in simple shapes for fun.
- Reel Lengths can be cut to measure
Cons
- No writing
- No pictures - or only a small number of them.
Neopixel Jewel
These are Neopixels in a round format - they are a ring, with another neopixels in the middle.
Pros
- These are a perfect cute eye shape.
- I could mount these really easily.
Cons
- Very limited in resolution and shapes - but then I can see simple imaginative ways to make use of them - so not much of a con really.
- Big one - I don’t have any in my store.
RGB Matrix panel
Neopixels can be arranged in a grid setup. There are different sizes, and large panels. And they can still be daisy chained to form giant channels.
Pros
- The panel can be used to display text and complex figures.
- I have two 8x8 grids in my store.
Cons
- They are big
- I’d have to make a rig to mount it.
Decisions based on Pro’s and Cons
At this point, simple single LED’s, Neopixel sticks and Jewels are out. The simple LED’s because getting any kind of resolution would be frustrating, and that other solutions will display more with a bit less effort. The Neopixel sticks and Jewels are out because I don’t have them in my store.
The remaining contenders are the Microview, neopixel strips and neopixel panels. I think the panels are out - although very flexible in terms of content, they are heavy and bulky compared to the others. While there are far finer grained ones than the 5050 panels I have, I will exclude those because again, I don’t have finer grained ones in my store.
Between the strips and the Microview comes down to a smaller set of criteria.
- Neopixel strips are easier to mount - just about anywhere really. I won’t need to 3D print (unless I want to) additional parts just to mount them. They might even be self adhesive come to think of it.
- Neopixel strips are colourful - colour can be a powerful indicator.
- The PiConZero has a pin right on board to drive the strips. I would have to make up a wiring harness specifically for the Microview.
- Correction to the power - my strips say 5v not 6-7v. That should be good to go then.
- The Microview can display text and complicated figures - but can I read text during an event where the robot is moving?
- Neopixels can give directional indications.
- I was considering using the Microview to multiplex out additional IO. I may not need to.
- I did already spend a load of effort in the weekend digging out the Microview, flashing bootloaders on some, and demonstrating the HC-SR04 sensor with it.
- The strips I have are the low density 2801 strips though - not the high density 2812 type. This could be an issue.
So the result looks like it comes down to the strips. Once I’m happy that I can connect all the sensors to the Pi without the external 328 that the Microview also has, I think that will confirm it. Tomorrow I receive a Raspberry Pi GPIO extender board to experiment with.
The effort in the weekend is not a waste - a Microview linked with a sensor will come in handy for other designs, and I always had an eye on using a pair of Microviews like a pair of cute eyes in a robot design, this may have been one of the original Kickstarter ideas.
Next Steps
- If I’m going to make the Neopixels directional - make sure I mount the HC-SR04’s or design where they will go first.
- Start with a simple set of neopixel strips on the two sides, maybe a strip on the front.
- Write the menu code - so the pad can be used to select a mode, with neopixel colours and specific locations being used to choose the mode.
- Get the GPIO extender mounted.
- Mount and Wire up the two additional HC-SR04 sensors to the GPIO extender.
- Write the straight line HC-04 code, using the strip to indicate debug on which sensor is closer.
- Sort out full multicolour over the rainbow with return.
- With Jonathan - practice driving more.
- Maze solving code.
- What about duck shoot and slightly deranged golf? Erg… Not really prepared for it! My robot may be able to push a ball around between the front tracks. Plan something for duck shoot.
- More coding and testing.
And now a little panic - so there are 10 days. That is more than 10 items - and there will be work on most of those days, with actual travelling on the last. Hmm. Lets try and get the neopixels mounted now then!
Where to put the NeoPixels
Ok - lets simply wrap one length around the top deck, and then another around the middle deck. This will mean I could use two rails to indicate stuff.
So I need to work out the mounts for the two further HC-SR04 devices. These will be on the left and the right of the robot. It’s time to measure up for brackets for these.
More sketching and Fusion 360 next.