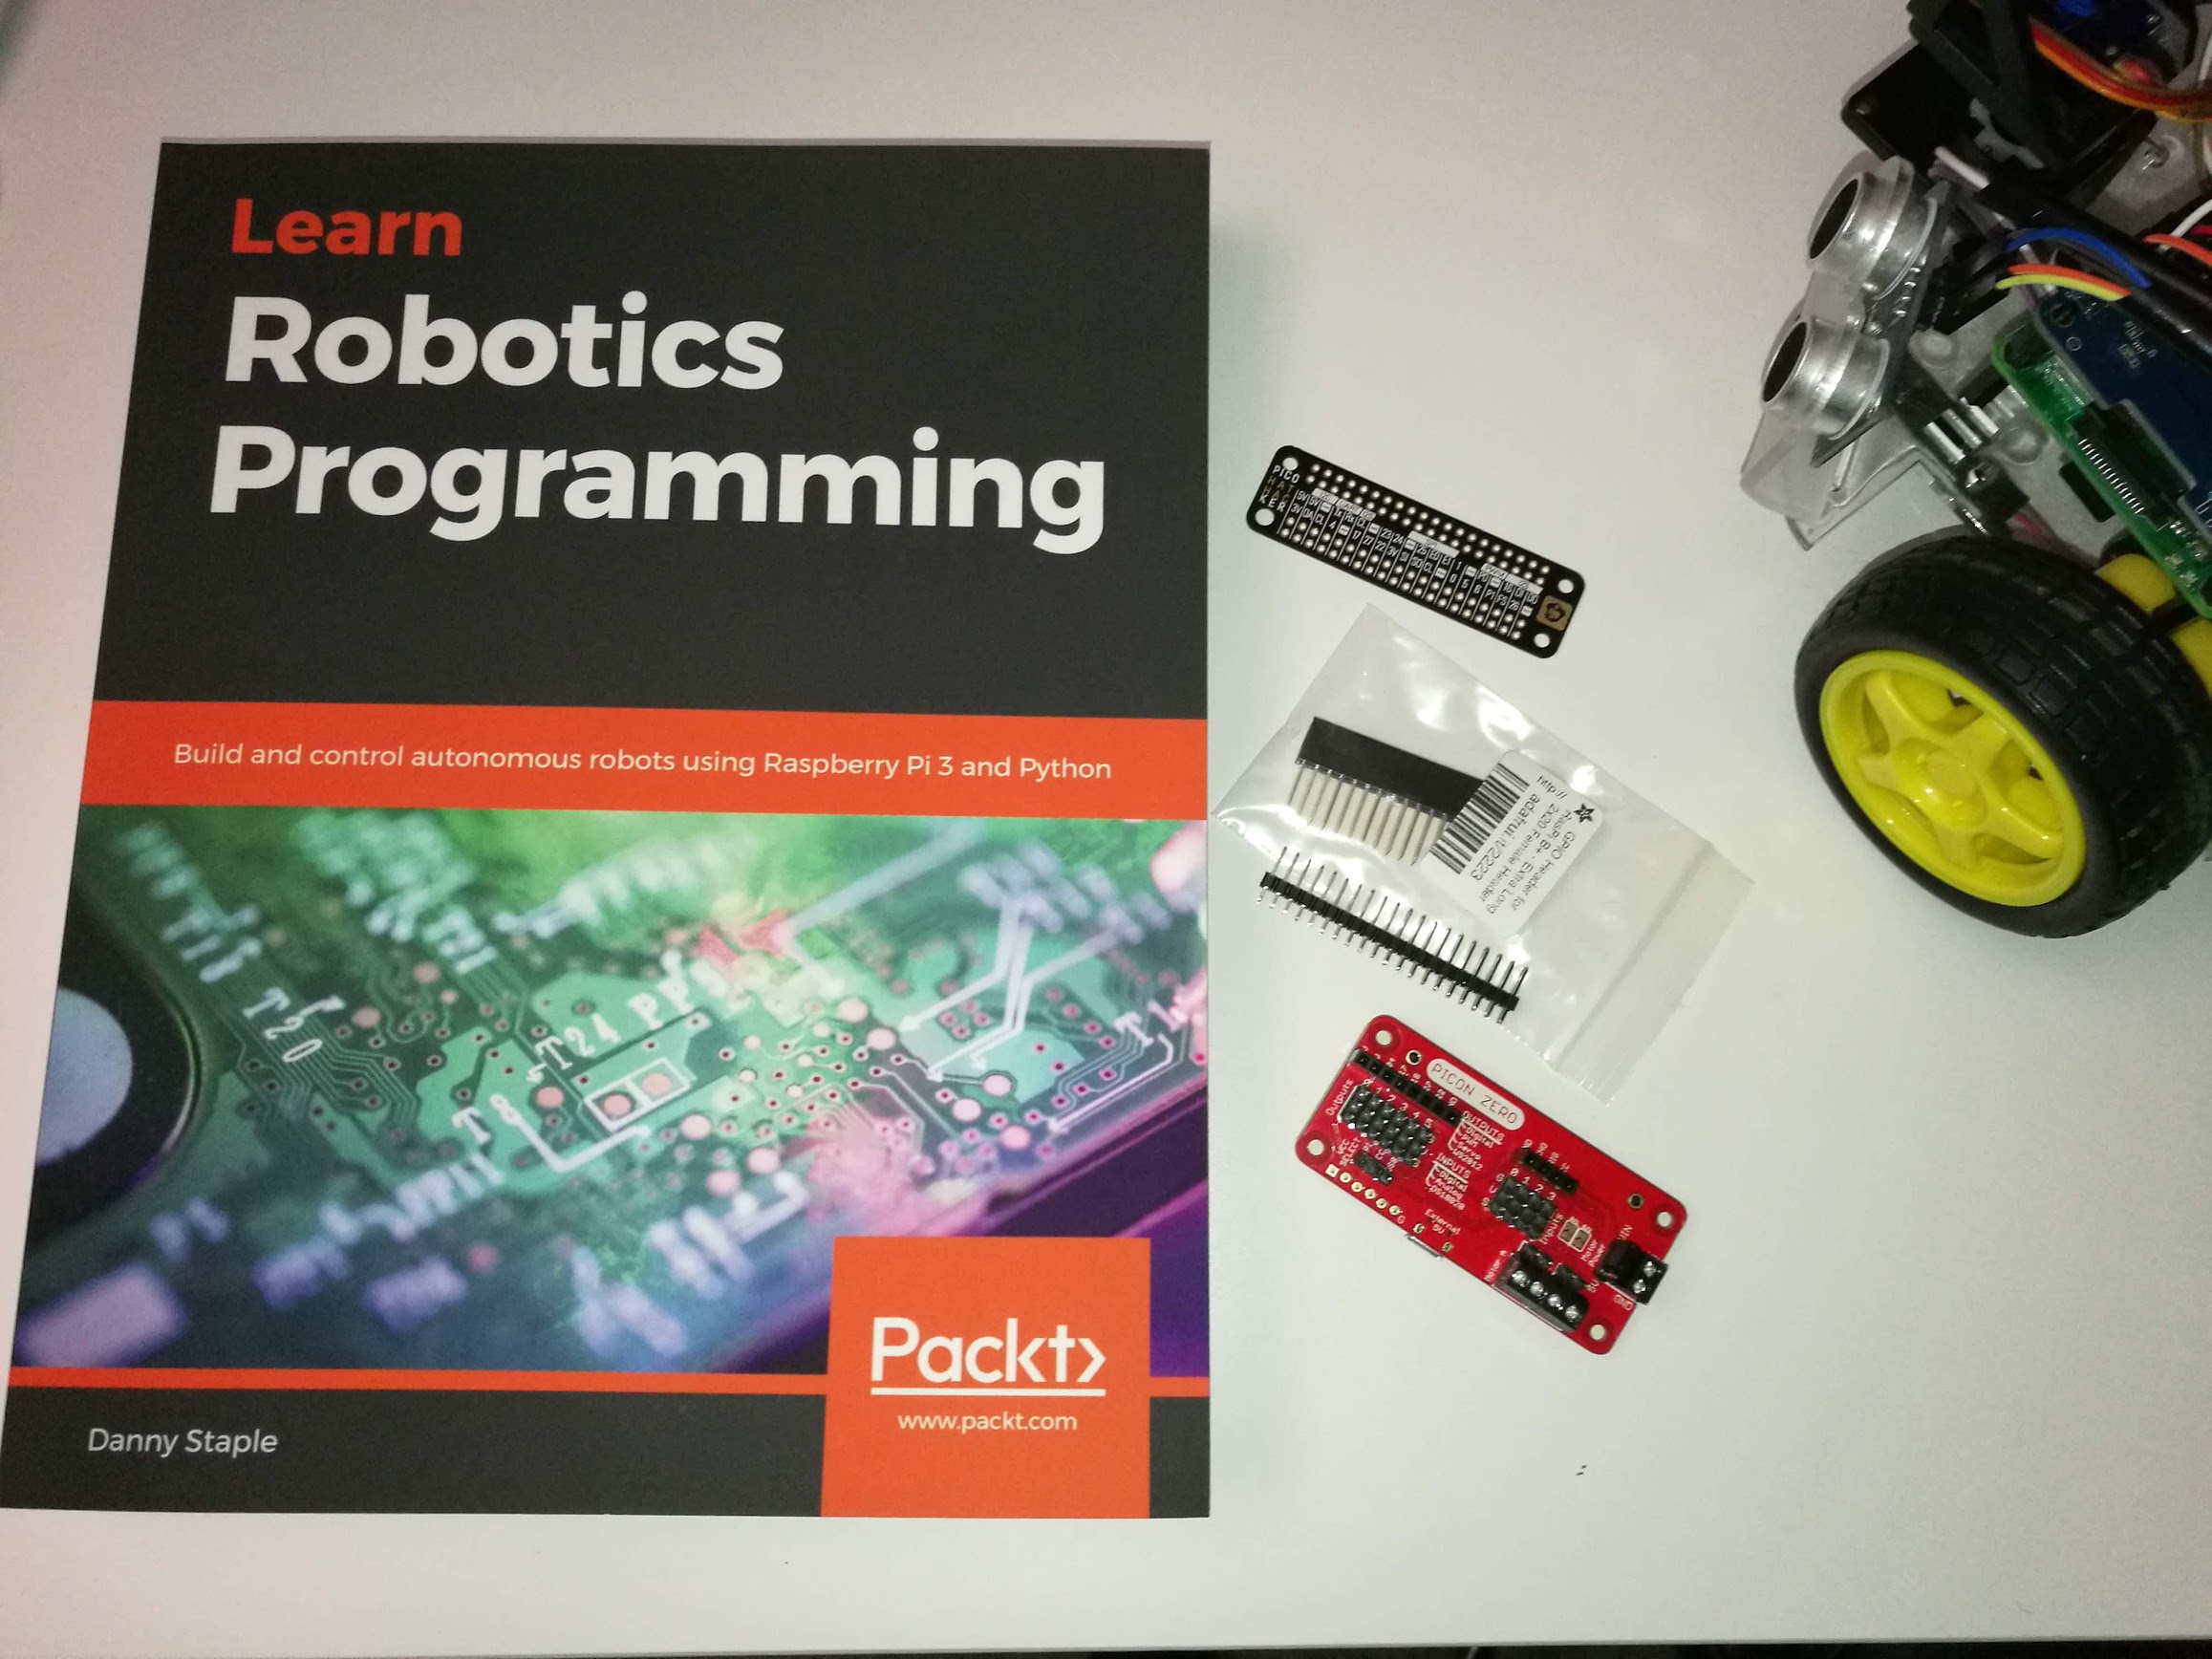
 When writing the book Learn Robotics Programming, I took the reader through choosing a motor controller, so they would be able to pick their own.
I then made a recommendation for the Full Function Motor Hat - a motor hat available from Alibaba, eBay and Amazon from time to time.
This hat is internationally available, but my preferred motor controller board, if you can purchase it, is the 4Tronix Picon Zero.
When writing the book Learn Robotics Programming, I took the reader through choosing a motor controller, so they would be able to pick their own.
I then made a recommendation for the Full Function Motor Hat - a motor hat available from Alibaba, eBay and Amazon from time to time.
This hat is internationally available, but my preferred motor controller board, if you can purchase it, is the 4Tronix Picon Zero.
In this first part, I want to cover getting the board connected, adapting from chapter 7 in the book, and getting the part running like the motor hat shown.
In the posts following today’s, I will look at getting it connected to sensors in part 2, and getting it connected to servo motors in part 3.
A bit of background
When working with the Raspberry Pi, a hat is a board that you attach to it to extend Raspberry Pi functionality, perhaps connecting GPIO pins to external devices.
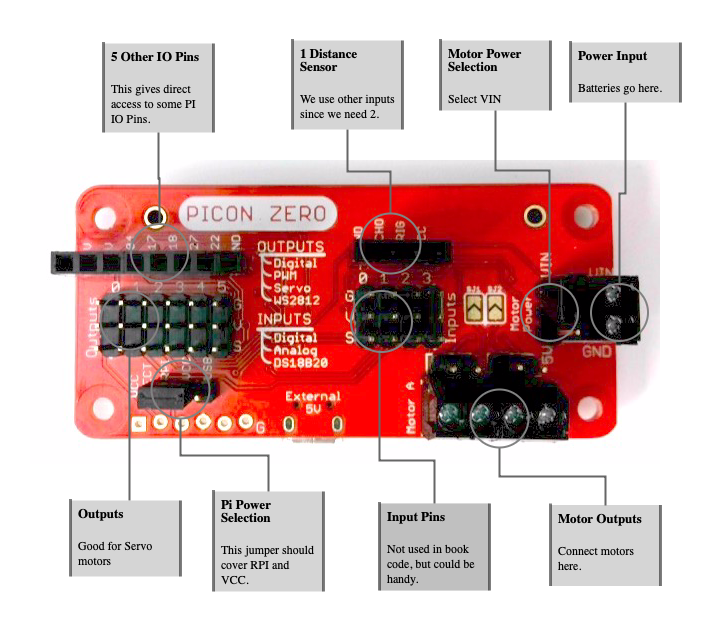
When building a robot, the fairly standard way to start is a small wheeled rover robot. To drive those wheels, you need motors. You cannot directly connect the Raspberry Pi to motors, so a motor control board, or motor control hat is necessary. The Picon Zero is such a motor control hat. The block diagram in the section “Connecting the motors to the Raspberry Pi” illustrates this well.
 4tronix Picon Zero v1.3 Intelligent Robotics Controller Board for Raspberry Pi (paid link)
Physical Connection
The PiCon Zero is a hat that fits directly over the Pi, and it can be slotted straight onto the GPIO pins exactly as the Motor board used in chapter 7. You should be able to following along with the section “Connecting the motors to the Raspberry Pi” in Chapter 7 of Learn Robotics Programming with a few modifications.
If you are using the Raspberry Pi 3B+, along with the detailed square of insulating tape as shown in the book, I recommend using a stand-off shim packaged with the PiConZero.
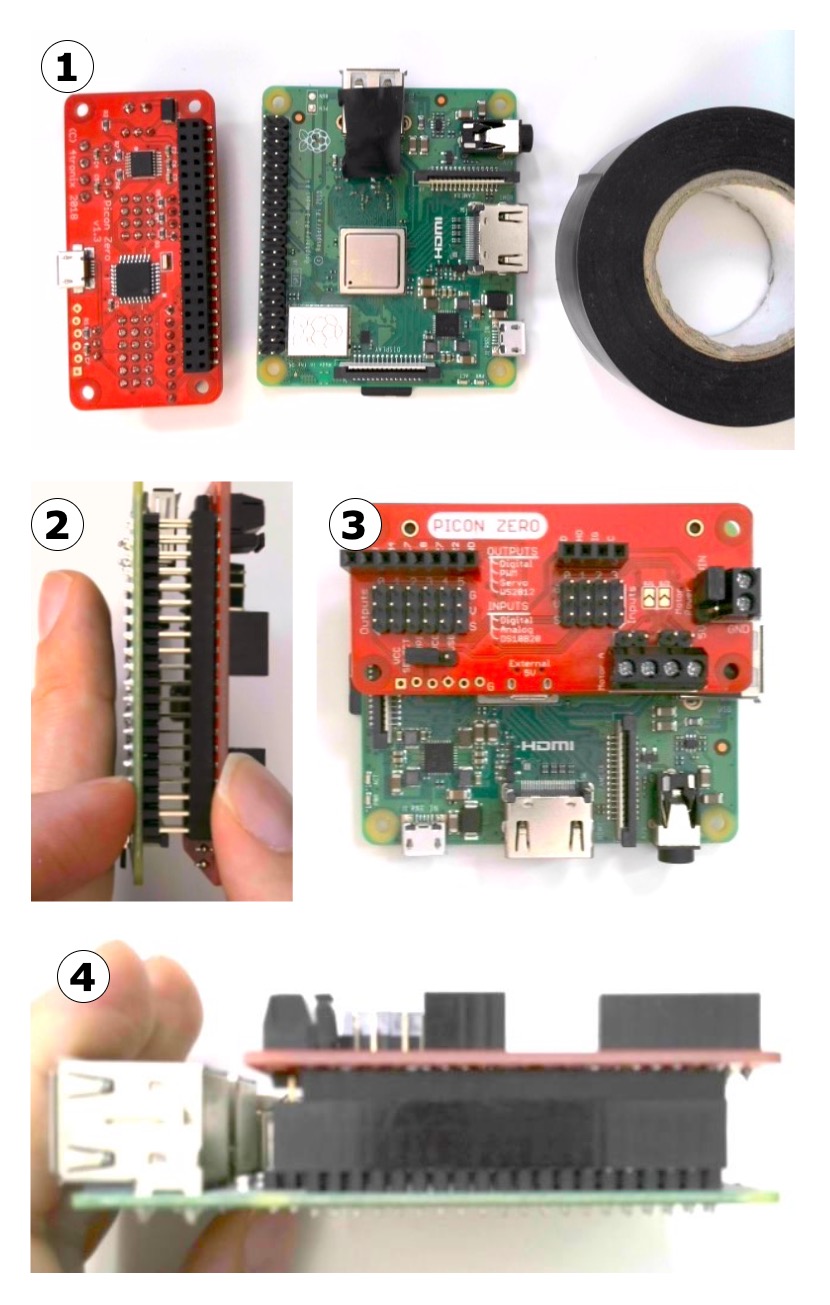
- For the 3A+ you’ll need the PiCon Zero, the Raspberry Pi 3A+ and some insulating tape. I’ve put a bit of tape on the USB socket, to stop the PiConZero catching it.
- Push the Pi and the hat’s together.
- And the PiConZero should be covering the Raspberry Pi like so.
- Alternatively, for a Raspberry Pi 3B+, there is an additional header shipped with the PiConZero. Put it between the two as shown.
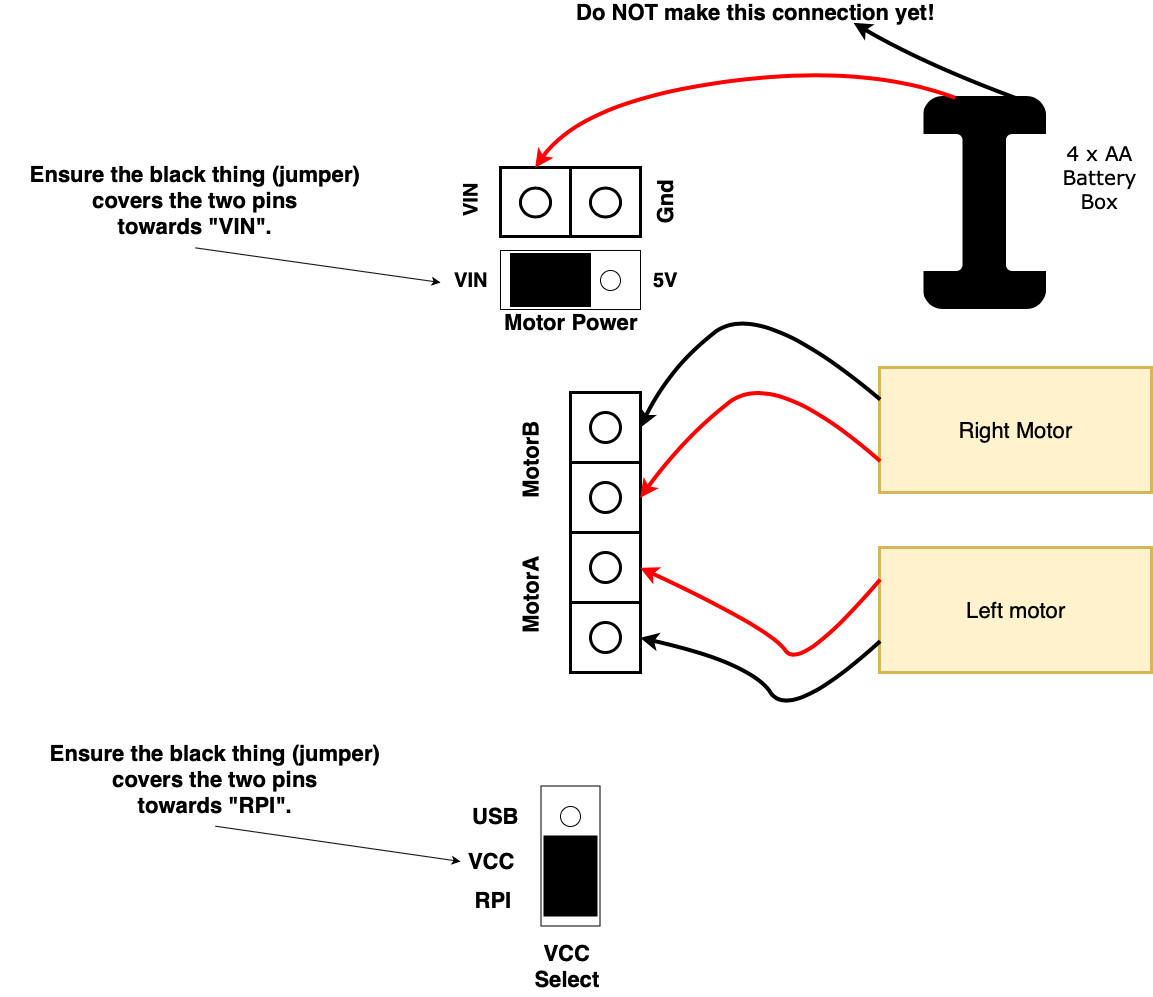
Wiring In
You will need to then wire in the PiCon Zero as shown:
Preparing The Pi
Installing the PiCon Zero libraries
SSH into the Raspberry Pi. To get the library onto the Pi use this code (from 4tronix):
    wget http://4tronix.co.uk/piconz.sh -O piconz.sh
    bash piconz.sh
Running the command should create a subdirectory called piconzero with its source in it.
Test - finding the motor hat
The steps for finding the motor hat are the same as the book, other than when running i2cdetect -y 1, the PiCon Zero is at address 22 and not 6f.
    pi@myrobot:~ $ sudo i2cdetect -y 1
         0  1  2  3  4  5  6  7  8  9  a  b  c  d  e  f
    00:       -- -- -- -- -- -- -- -- -- -- -- -- --
    10: -- -- -- -- -- -- -- -- -- -- -- -- -- -- -- --
    20: -- -- 22 -- -- -- -- -- -- -- -- -- -- -- -- --
    30: -- -- -- -- -- -- -- -- -- -- -- -- -- -- -- --
    40: -- -- -- -- -- -- -- -- -- -- -- -- -- -- -- --
    50: -- -- -- -- -- -- -- -- -- -- -- -- -- -- -- --
    60: -- -- -- -- -- -- -- -- -- -- -- -- -- -- -- --
    70: -- -- -- -- -- -- -- --
The Code
In the book, I emphasise the importance of having a robot layer for your code to work with, and the example code shown is set up to work with the Full Function Motor Hat. However, if we are to build the same robot layer, compatible with the same behaviours, how would we adapt this for the PiCon Zero?
We can start with the simple code for Chapter 7. The resulting system is in the GitHub repo for the book at https://github.com/PacktPublishing/Learn-Robotics-Programming/tree/python3/chapter15/full_system/piconzero_example. The testing motors experiments are some of the earliest that get your robot moving.
Test - the motors move
The source file test_motors.py is a little different with the PiCon Zero, but helps you get used to switching out motor controllers.
The piconzero is a bit easier to work with than the Raspi_MotorHAT in that you don’t need the .run calls. See test_motors.py:
    import piconzero as pz

    import time
    import atexit

    atexit.register(pz.stop)

    pz.setMotor(0, 127)
    pz.setMotor(1, 127)

    time.sleep(1)
Upload this to the Raspberry Pi. Before running this, a quirk of the PiCon Zero code that means you need to add it into the PYTHONPATH. When running the code, use the following line:
PYTHONPATH=~/piconzero python test_motors.pyThe same troubleshooting steps apply, with this additional one:
If you see:
    $ python test_motors.py
    Traceback (most recent call last):
    File "test_motors.py", line 1, in <module>
        import piconzero as pz
You need to make sure that you have installed piconzero, as shown in Installing The Picon Zero libraries above. You also need to ensure you start the code with the PYTHONPATH in front:
PYTHONPATH=~/piconzeroTest - spinning backwards
To go backward on the Picon Zero, set the motors speed to a negative value:
    pz.setMotor(0, 127)
    pz.setMotor(1, -127)
This code makes the right motor go backward, so the robot spins.
Putting The PiCon Zero Into The Robot Object
The robot.py code is a little different for this board, as it is for each motor controller.
I put this in pz_robot.py:
    import piconzero as pz

    import atexit

    class Robot(object):
        def __init__(self):
            pz.init()
            atexit.register(self.stop_motors)

        def stop_motors(self):
            pz.stop()
In the file behavior_path.py, we still need piconzero at the moment:
    from pz_robot import Robot
    import piconzero as pz
    from time import sleep

    r = Robot()
    pz.setMotor(0, 127)
    pz.setMotor(1, 127)
    sleep(1)
To further separate our motor board implementation from our behaviours, we need some code to convert the speed.
In robot.py, inside the Robot class add:
    def convert_speed(self, speed):
        return (speed * 127) // 100
You’ll notice the double slash. That is so this produces an integer (whole number) value only.
You can then modify behaviour_path.py to use 0-100% values for speeds.
    import robot
    from Piconzero import pz
    from time import sleep

    r = robot.Robot()
    pz.setMotor(0, r.convert_speed(100))
    pz.setMotor(1, r.convert_speed(100))
    sleep(1)
That code still uses the pz.setMotor call, which is specific to the PiCon Zero.
We can roll that, along with the speed conversion into our robot class.
    class Robot(object):
        .
        .
        .
        def set_left(self, speed):
            pz.setMotor(0, self.convert_speed(speed))

        def set_right(self, speed):
            pz.setMotor(1, self.convert_speed(speed))
We don’t need the complication of a run mode here, as the PiCon Zero motors don’t need it.
We also do not need the abs, or the int calls as the speeds go negative to go backwards, and the double slash creates integers for us.
We can now make a smaller and simply behaviour_path.py:
    from pz_robot import Robot
    from time import sleep

    r = Robot()
    r.set_left(80)
    r.set_right(80)
    sleep(1)
You can use this Robot class from here for the other parts of the book.
In the next part, we’ll look at adapting the sensor connections for this board.
Example Code
Code for this article can be found at https://github.com/PacktPublishing/Learn-Robotics-Programming/tree/python3/chapter15/full_system/piconzero_example. Going up from there shows the full Python 3 examples. This code should work in both python3 and python2 versions.