Have you wondered about the basics for getting a robot driving? I originally wrote this for a coder dojo worksheet, but it is suitable for anyone getting started.
What you need
- A robot kit
- Some kind of chassis
- Two motors
- Two wheels
- A battery pack - 3xAA is a good choice - between 4.5V and 5V
- A motor controller like the Cytron Maker Drive.
- A Raspberry Pi Pico
- A breadboard, and some jumper wires
- A usb cable to connect the Pico to your computer
- Thonny installed on your computer
The tutorial assumes you’ve installed Micropython on the Raspberry Pi Pico.
Wiring
For this tutorial, the motor controller is connected to the Pico as follows:
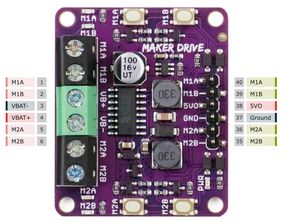
The left hand side of this has screw terminals. They should be connected as follows:
- M1A and M1B to one motor
- M2A and M2B to the other motor
- VBAT+ and VBAT- to the battery pack
The right hand side of the board has control pins, and power for the Pico. They should be connected as follows:
- M1A to Pico GP0
- M1B to Pico GP1
- M2A to Pico GP2
- M2B to Pico GP3
- 5VO to the VSYS pin on the Pico
- GND to the GND pin on the Pico
Use the breadboard to make the connections.
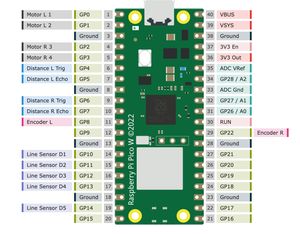
Here is the Pico pin out, with suggested sensor connections (for later expansions):
Connect the Raspberry Pi Pico and launch Thonny. In the bottom right of Thonny, look for Raspberry Pi Pico.
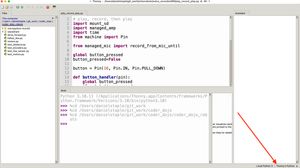
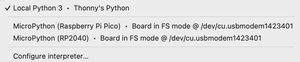
You should see “MicroPython (Raspberry Pi Pico)” appear in the bottom right. If the repl is open (View->Shell), you should see the MicroPython prompt.
Traceback (most recent call last):
  File "main.py", line 1, in <module>
  File "follow_line.py", line 37, in <module>
KeyboardInterrupt:
MicroPython v1.20.0 on 2023-04-26; Raspberry Pi Pico W with RP2040
Type "help()" for more information.
>>>
This means the robot is ready to run code.
Turning a motor on
It’s easy to turn a motor on, but it won’t give you precise control:
import time
from machine import Pin

ml1 = Pin(0, Pin.OUT)
ml2 = Pin(1, Pin.OUT)

try:
    ml1.value(0)
    ml2.value(1)
    time.sleep(0.5)
finally:
    ml1.value(0)
    ml2.value(0)
This code starts by setting up two motor pins, and making sure they are OUTPUTS with Pin.OUT. Then it sets the first pin to 0, and the second to 1. This will make the motor turn forwards. It then waits for 0.5 seconds, and then sets both pins to 0, which will stop the motor.
The try/finally block is important, as it means that if the program crashes or is stopped, the motor will always be stopped. This is important, as if the motor is left running, it will drain the battery or the robot will drive off a table!
Turn on the battery pack for the robot, then prop the robot up so the wheels aren’t contacting anything. It’s common when testing robots to prop them up so they don’t drive away with the laptop plugged in.
Use the run button in thonny. You should see the robot drive forwards for 0.5 seconds, and then stop. If you swap which pin values are set to 1 and 0, the motor will drive backwards. However, robot motors can drive at different speeds, so this isn’t a good way to control the robot.
Using PWM to control the motor speed
Motor outputs from a Raspberry Pi Pico use PWM, which in short allows to control speeds by varying how much time a pulse is on in proportion to how much time it is off. This is known as a duty cycle. In Micropython on the Pico, this value is between 0 and 65025, allowing variable speeds.
import time
from machine import Pin, PWM
PWM_MAX = 65025

ml1 = Pin(0, Pin.OUT)
ml2 = Pin(1, Pin.OUT)

m1 = PWM(ml1)
m2 = PWM(ml2)

try:
    m1.duty_u16(int(PWM_MAX * 0.3))
    m2.duty_u16(0)
    time.sleep(0.5)
finally:
    m1.duty_u16(0)
    m2.duty_u16(0)
We’ve set up a PWM_MAX for the maximum speed here.
The code above sets up the motor pins as before, but then wraps them as PWM outputs. It then sets the duty cycle of the first pin to 30% of the maximum, and the second pin to 0. This will make the motor turn forwards at 30% speed. It then waits for 0.5 seconds, and then sets both pins to 0, which will stop the motor.
Try changing that 0.3 value to different values between 0 and 1 and see how the motor speed changes - it may stop completely at some values. You can also change the timing.
To go backwards, you need to swap m1 and m2 pins in the duty cycle setting.
We have two motors though - so how do we control both?
Making a motors module
We are going to make a module called motors.py. This will take the code above for motor speeds, and stopping motors, and make it easier to use.
Create a new file in Thonny, and save it as motors.py.
from machine import Pin, PWM
PWM_MAX = 65025

class Motor:
    def __init__(self, pin1, pin2):
        self.pin1 = Pin(pin1, Pin.OUT)
        self.pin2 = Pin(pin2, Pin.OUT)
        self.m1 = PWM(self.pin1)
        self.m2 = PWM(self.pin2)

    def stop(self):
        self.m2.duty_u16(0)
        self.m1.duty_u16(0)

    def drive(self, speed):
        if speed > 0:
            self.m1.duty_u16(int(PWM_MAX * speed))
            self.m2.duty_u16(0)
        if speed < 0:
            self.m2.duty_u16(int(PWM_MAX * -speed))
            self.m1.duty_u16(0)
Motor outputs from a Raspberry Pi Pico use PWM, which in short allows to control speeds by varying how much time a pulse is on in proportion to how much time it is off. This is known as a duty cycle. In Micropython on the Pico, this value is between 0 and 65025, allowing variable speeds.
There’s then a Motor class, which takes two pins, and sets them up as PWM outputs. This is in a class so we can use it once for each motor.
The stop method sets both pins to 0, causing the robot to stop - this is the most important part of the motor class!
The drive method sets the pins to the correct values to make the motor move - it takes a speed between -1 and 1, using fractions. So -0.3 is 30% speed backwards, and 0.5 is 50% speed forwards. It multiplies this by the PWM_MAX to get the correct value and send it ot the right pin for the motor direction.
Let’s test this out.
Moving 1 motor
This is is the same as our motor speed test, but using hte motors module.
import time
from motors import Motor

motor_1 = Motor(1, 0)

try:
    motor_1.drive(0.3)
    time.sleep(0.5)
finally:
    motor_1.stop()
This code is now much simpler. We can change the call to drive to make the motor go forwards or backwards, and at different speeds, as well as changing the time.
Try this out by uploading motors.py to the robot, and sending this as main.py. You should see the robot drive forward for 0.5 seconds, and then stop.
Next try changing the drive value between -1 and 1 to see how fast the motor can go. Try changing the sleep value - but don’t make it too big or you may be running after the robot!
It’s also easy now to control 2 motors.
Moving both motors
Lets extend this to a second motor.
import time
from motors import Motor

motor_1 = Motor(1, 0)
motor_2 = Motor(2, 3)

try:
    motor_1.drive(0.3)
    motor_2.drive(0.3)
    time.sleep(0.5)
finally:
    motor_1.stop()
    motor_2.stop()
This code lets us make both motors drive forwards at the same speed for 0.5 seconds. Try changing the speed, and the sleep time. If you want to try this on the floor with a longer sleep time, name this file main.py, and upload to the robot, then disconnect the USB cable and turn on the battery pack. The robot should drive forwards for 0.5 seconds, and then stop. Don’t drive it for more than 0.5 seconds on the table, and look out for the legs of people, tables and chairs!
Trying turning in a circle
We can make the robot turn in a circle by setting the speeds to opposite values.
    motor_1.drive(0.3)
    motor_2.drive(-0.3)
Try this in the above example, and the robot should turn on the spot. If you swap the signs, the robot should turn the other way.
Try making a curve
We can make the robot turn in a curve by setting the speeds to different values.
    motor_1.drive(0.3)
    motor_2.drive(0.1)
Putting things together to make the robot draw a shape
You can now take these, along with timers, and put them together to make the robot drive in a shape, or dance on the floor.
Here is an example of a (rough) square
import time
from motors import Motor

motor_1 = Motor(1, 0)
motor_2 = Motor(2, 3)

try:
    for n in range(4):
        motor_1.drive(0.3)
        motor_2.drive(0.3)
        time.sleep(0.5)
        motor_1.drive(0.3)
        motor_2.drive(-0.3)
        time.sleep(0.5)
finally:
    motor_1.stop()
    motor_2.stop()
This must be run on the floor, and you should be ready to catch the robot if it goes wrong!
Challenge
- Can you make the robot draw a triangle?
- Could you try making the robot dance, or do a victory spin at the end of a shape?
- The shape isn’t perfect, as the motors are never exactly the same speed. Can you make the robot drive in a better square by changing the speeds?
Further reading
If you’ve enjoyed learning this, consider getting a copy of Robotics at Home With Raspberry Pi Pico, where you can learn to build a chassis using CAD, adapt to CircuitPython, and add sensors to your robot.