In this tutorial, I will show how to use a pair of distance sensors for wall avoiding. This is a common task for robots, and is a good way to get started with sensors. We will build this with a simple “Bang bang” algorithm.
This is part of a series of tutorials on building and programming robots for my local Coder Dojo.
We will be using Thonny to write this code.
The robot
The robot we are using is a simple two wheeled robot, with a caster wheel at the front. See Raspberry Pi Pico Line Follower for details on how to build the robot.
We will be adding some further components:
- 2 x RCWL-1601 distance sensors. These are 3v3 compatible, so good for Raspberry Pi’s and Raspberry Pi Pico’s. They are cheap, and easy to program as HC-SR04 (a common distance sensor) code works with them.
- Some way to attach them or strap them to the robot. For the coder dojo robots I used cable ties, for my Piwars robots I’ve used 3D printed mounts. Note that these do not fit HC-SR04 brackets and are slightly smaller.
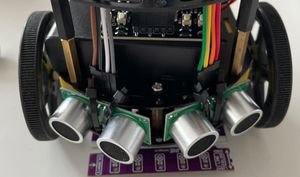
Attaching the sensors
The sensors should be at the front of the robot, with the two large cans facing forward. Place one on the left side, and one on the right. They can be facing slightly outward, but not by more than around 10 degrees.
Wiring
The RCWL-1601 sensors are 3v3 compatible, so we can connect them directly to the Raspberry Pi Pico. The sensors have 4 pins:
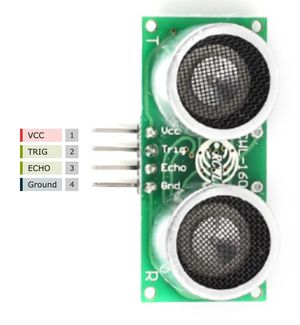
We will wire it to the Raspberry Pi Pico as follows:
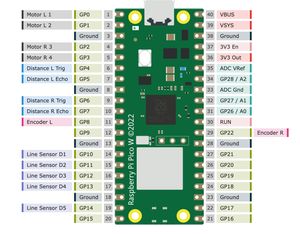
The sensors are connected to the following pins:
| Sensor | Sensor Pin | Raspberry Pi Pico Pin |
|---|---|---|
| Left | VCC | 3V3 |
| Left | GND | GND |
| Left | Trig | GP4 |
| Left | Echo | GP5 |
| Right | VCC | 3V3 |
| Right | GND | GND |
| Right | Trig | GP6 |
| Right | Echo | GP7 |
Code for Robot.py
We depend on code that has:
- A
robotmodule with aset_speedfunction that accepts a motor number and a speed between-1.0and1.0like the code from my book Robotics at Home With Raspberry Pi Pico. You can also adapt this for your own motor control code. - The
robotmodule should also have astopfunction that will stop all the motors.
This has been explained in previous tutorials. Here is the code for robot.py (micropython) so you can get started:
from machine import Pin, PWM
PWM_MAX = 65025

class Motor:
    def __init__(self, pin1, pin2):
        self.pin1 = Pin(pin1, Pin.OUT)
        self.pin2 = Pin(pin2, Pin.OUT)
        self.m1 = PWM(self.pin1)
        self.m2 = PWM(self.pin2)

    def stop(self):
        self.m2.duty_u16(0)
        self.m1.duty_u16(0)

    def drive(self, speed):
        if speed > 0:
            self.m1.duty_u16(int(PWM_MAX * speed))
            self.m2.duty_u16(0)
        if speed < 0:
            self.m2.duty_u16(int(PWM_MAX * -speed))
            self.m1.duty_u16(0)

motors = [
    Motor(0, 1),
    Motor(2, 3)
]

def set_speed(motor, speed):
    motors[motor].drive(speed)

def stop():
    for motor in motors:
        motor.stop()
Quick note on what the sensors do
These sensors are ultrasonic. They emit sounds that are a higher pitch than most humans can detect in small bursts. They then measure how long it takes for that sound to echo back to the sensor.
If you’ve ever seen a submarine in a movie with a “ping” sound, that is what is happening here.
rcwl_1601.py:
from machine import Pin, time_pulse_us
from utime import sleep_us

class RCWL1601:
    def __init__(self, trigger_pin, echo_pin):
        self.trigger_pin = Pin(trigger_pin, Pin.OUT)
        self.echo_pin = Pin(echo_pin, Pin.IN)
        self.trigger_pin.value(0)

    us_to_cm = 0.0343 / 2

    def distance_cm(self):
        # Send a pulse
        self.trigger_pin.value(1)
        sleep_us(10)
        self.trigger_pin.value(0)
        # Measure the time it takes to get a pulse back
        return_time =  time_pulse_us(self.echo_pin, 1, timeout_us=100000)
        if return_time == -2:
            return 100

        # Now we have the time, we can calculate the distance
        return return_time * self.us_to_cm
Setting the trigger pin high for 10 microseconds, then low again triggers a sound pulse. The sensor then waits for the echo to come back. This could time out, if we get -2, return 100cm as a distance.
Because we measure the time, to make a distance, we use the speed of sound. The speed of sound is 343 meters per second. We divide this by 100 to get centimeters per second, 0.0343.
The sound pulse makes a round trip to the object and back, so we’d end up with twice the distance. We divide by 2 to get the right distance. We can store 0.0343 / 2 as a constant, and use that in our code.
Let’s try this out in a simple test.
import rcwl_1601
import time

left_sensor = rcwl_1601.RCWL1601(4, 5)
right_sensor = rcwl_1601.RCWL1601(6, 7)

while True:
    left_value = left_sensor.distance_cm()
    right_value = right_sensor.distance_cm()
    print("Left: ", left_value, "Right: ", right_value)
    time.sleep(0.01)
Run this code, and you can wave your hand in front of the sensors. If all is well, you should see the distance change being printed out in the thonny console.
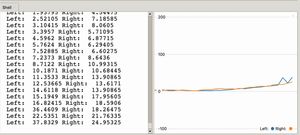
If you see errors and timeouts, check the code first, then check the wiring and pin numbers. It works well with reflective surfaces, but not so well with soft surfaces like curtains.
Let’s use this to make a robot that avoids walls!
Code for wall avoiding
This code makes decisions based on a value going over a limit. Let’s make something.
You can save this to the robot as main.py so it will run when the robot starts.
import robot
import rcwl_1601
import time

left_sensor = rcwl_1601.RCWL1601(4, 5)
right_sensor = rcwl_1601.RCWL1601(6, 7)


speed = 0.5
turn_distance_cm = 20

try:
    while True:
        if left_sensor.distance_cm() < turn_distance_cm:
            robot.set_speed(0, speed)
            robot.set_speed(1, -speed)
        elif right_sensor.distance_cm() < turn_distance_cm:
            robot.set_speed(0, -speed)
            robot.set_speed(1, speed)
        else:
            robot.set_speed(0, speed)
            robot.set_speed(1, speed)
        time.sleep(0.01)
finally:
    robot.stop()
For a first test, I suggest propping the robot to make sure it runs, and iron out any issues. This code makes the robot move forward at a slowish speed, you can increase the speed variable if you like. When it gets closer than 5cm to a wall, it will turn away from the wall. It checks the left sensor first, and if that is clear, it checks the right sensor. If both are clear, it will go forward.
The whole thing is wrapped in try..finally to ensure that even if there is an error, the robot will stop.
Send this to the robot, and let it go. It should avoid walls. However, it can get quite close and ride up a wall, or stuck in a corner. You can set that turn distance to a larger value if you like. There are other algorithms that can be used to make the robot avoid walls better, but this is a good start.
Learning more
You can learn more about building robots to avoid walls, follow objects or determine their location in space with my book Robotics at Home With Raspberry Pi Pico, where you can learn to build a chassis using CAD, adapt to CircuitPython, and add sensors to your robot.