This month I managed to break two items - a motor bracket and a Raspberry Pi Pico W. Both through small but silly mistakes.
Now it’s said if you aren’t breaking things enough, you aren’t learning enough. I probably had a fair share of coding mistakes, but those are easily detected and fixed. The mistakes here were physical things, and I had to fix or replace them.
The Raspberry Pi Pico W
I was working on robots for the Coder Dojo, using a Raspberry Pi Pico W. First, it’s worth noting that a Raspberry Pi Pico without the W would work well, as bluetooth and wifi are going to struggle in the busy environment of a Dojo. There can be 70+ kids, with their parents in a room, so a lot of WiFi traffic.
I’ve built a reference robot for the Coder Dojo, with the intent of creating a fleet of them. This has a Raspberry Pi Pico, breadboard, distance sensors, line following module, motor breakout and batteries on an Adafruit Mini Round 3 layers robot chassis kit. The robot started from Worksheet on driving robots with Micropython.
I was doing an example with the distance sensors, for my sheet Coder Dojo Robot Wall Avoiding. I had the left and right sensors the wrong way around, with respect to the code and the coder dojo wiring reference sheet. I wondered why it wasn’t working, and then realised my mistake.
Working a little too late at night (when mistakes often happen), I pulled the wires for the sensors to rewire them, and knocked out the power wires from the motor board (a Cytron maker drive). As I put the distance sensor wiring back, into the breadboard, I noticed the power wires were out. I jammed them back in, and they were inverted - ground into 5v and 5v into ground. I tried turning it on, it didn’t respond, and checking my wiring I realised my mistake.
After I reversed them, the Pico W wasn’t dead, but some output pins weren’t working. More crucially, some timing functions would just make things hang, rendering this Pico W pretty useless. I’ve swapped it for a regular Raspberry Pi Pico for now, but I’ve also ordered a replacement W.
We may still try WiFi robots in the Dojo, so I do want to keep that option open.
What did I learn from this mistake?
- I should have checked the wiring before powering it on. Especially power wiring.
- Wire colours and labelling - ensure this is clearer. There are labels on it. The wires are generic male-female dupont wires, but for power and ground, pay attention to colours.
- I should have had a reference card to hand, and not tried to do it from memory.
- Don’t work that late in the evening on something that needs concentration, like wiring.
What could I change
- Down tools earlier, or work on software with lower stakes if it’s late.
- I could use a different colour for power and ground. I have a lot of black wires, and I could use red for power and black for ground.
- Considering how I might label up the Pico W in place. Maybe a sticky label on the breadboard if there is space? I’ve used that technique before with the old Explorer 1 robot design.
- Breadboards and dupont cables make unintended reversals and off by one mistakes easy. A designed for purpose PCB could improve this, but given that it’s a small fleet of robots, it might be a little expensive.
The motor bracket
I have a Sparkfun Shadow Chassis, which I’ve been using to take photos for a project in progress. I was once again working into the night.
I was assembling/disassembling this chassis to get photos. Which is not something it was designed for. I was being impatient, and one of the motor brackets snapped.
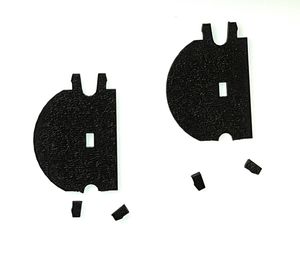
See Replacement Shadow Chassis Motor Bracket for the full story, and how I 3D printed a replacement part. I’ve also bought a new chassis, as I want to keep the old one intact for demonstration purposes.
What did I learn from this mistake?
- Don’t be impatient. Take your time.
- Don’t work that late in the evening on something that could be frustrating, like separating parts using snaps.
- Don’t force things. If it’s not working, stop and think about it.
- Gained some good FreeCAD and 3D printing experience.
What could I change
- Down tools earlier, or work on software with lower stakes if it’s late. I’m seeing a pattern here.
- Having a second chassis not assembled would make getting photos easier.
- I could have used a different tool to separate the parts. I was using a plastic spudger, but that was threatening to break too. I could have used a metal spudger, or a flat head screwdriver.
- Take my time and be more patient prying these components apart.
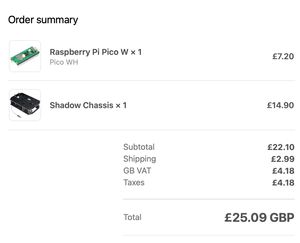
Conclusion
My mistakes were small, and racked up a cost of only £25.09 at the Pi Hut, one of my favourite retailers for Raspberry Pi and Pico related items. However, given that I’ve learned from them, and I’ve got a new Pico W and a new chassis, I’m not too upset about it.
When you build a robot, or other gadget, you will make mistakes too. Watch your tiredness or frustration levels, and do something else if they are becoming a problem. But don’t let mistakes put you off building things. Again, if you aren’t making mistakes, you might not be trying hard enough.
Building your first robot
Have you build a first robot? Or are you building robots but would like to extend your skills? Consider Robotics at Home With Raspberry Pi Pico. I’ve written it to be a gentle introduction to robotics, with a focus on building robots and programming them with Python - a variant called CircuitPython designed for tiny controllers. Go from not having built a robot, to trying interesting behaviours like wall following, obstacle avoidance and the robot locating itself in an arena.