Foam Core Drawer Dividers

To get better access to tools in my closest drawer, I make dividers with foam core and hot glue. read this to see how I made them, what inspired it and perhaps get inspired to try this too.
Like so many makers, or people with multi-functional rooms, I have some drawers that have become dumping grounds, general places to stash stuff that I want access to. This is no more pronounced than the drawer to the immediate right of my work desk.
My work desk serves a few purposes in the house. During the day it is my home office, so I use it for my day job. This is mostly a matter of writing code and attending online meetings.
During the evening I use this desk when writing robot books, robot code, or I move the laptop so I can use the space for robot building and soldering. Yes, the desk has a few nicks in it already.
The drawer has things I want to have to hand. But it also became a dumping ground. When I’d clear small parts off my desk, like components and wires, I’d stuff them in part of that drawer. So I could have easy access to them later. As you can imagine this became a little frustrating to find things in, so stuff began to get lost in this dumping ground.
Inspiration from Tested
I am a fan of the tested.com videos by Adam Savage. He is not actually a fan of drawers and sees them as a place things go to die. I think his principle of first class access to everything is great, but doesn’t quite work for my tiny space. All my making is done in a space that is about 2m x 3m.
One of his videos showed him making drawer dividers with foam core and a hot glue gun. And I felt inspired - this was perhaps exactly what this drawer needed. Plus - I had a bit of foam core stock and a hot glue gun. Why not give it a go.
Inventory
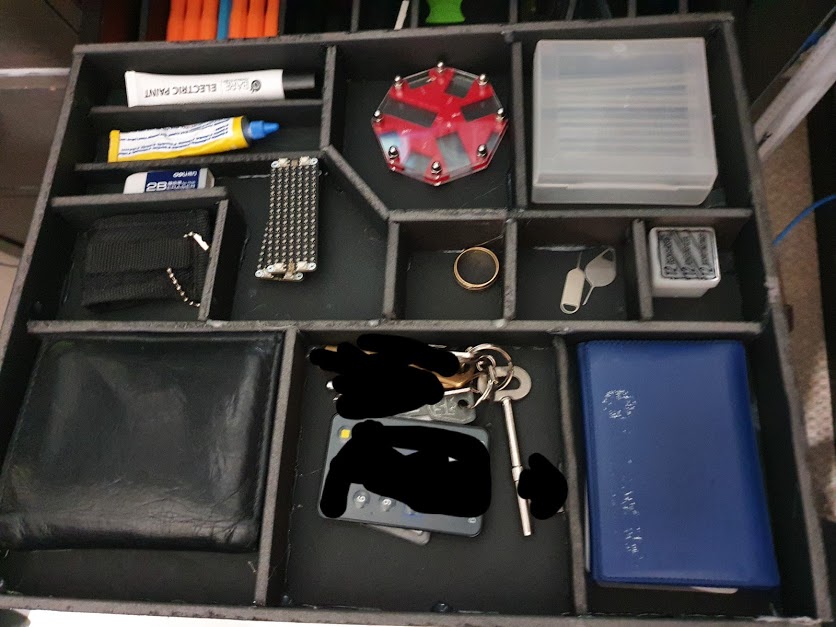
My first stage was to see what the drawer had in it, and make a list of what was there. Probably, I’d not need all of this stuff, and some should go into the storage bins above.
The drawer had some personal bits I wanted easy access to when I go out, need to pay or validate my identity:
- Keys
- Bank dongle
- Wallet
- Cards
- Orionrobots Business cards case
- Anti-bacterial Hand gel
Then it had tools and robot related things:
- Bare Electric Paint
- Poly cement
- A few breadboards
- Some wires, resistors, buttons and leds.
- The OctoSnap a Pimoroni tool for snapping off headers at different lengths. It’s quite handy when doing many headers. I don’t think they make these any more.
- A belt style multi-tool.
- Some Pimoroni Packs for Raspberry Pi Pico
- Set of needle files
- Soldering helper tools - for hot air, wire manipulation and so on.
- Soldering tweezers kit.
- Spudgers, suckers and plastic prying tools.
- 3d printing radius gauges.
- Screwdriver hex bits - many sizes.
- Allen keys - many sizes.
- A pocket size spirit level
- A small hand drill for fine work and a set fo bits.
- An engineer thread tapper.
- A screwdriver multitool - pocket sized.
- Pencils, erasers.
- Rulers - small plastic ones.
- Raspberry Pi Pico’s and headers.
And random lab stuff:
- Microscope slides and covers.
- Phone opening tools
This drawer isn’t a big one - it’s outside dimensions are approximately 400mm x 300mm x 80mm. That is a lot of stuff to rummage.
This stuff wasn’t all loose - there were random containers for some of it.
What stays?
So the first thing was to eliminate a few things that should be elsewhere. The electronic components and breadboards went into storage bins. Immediate projects do have a storage space that isn’t this drawer. Although some of the Raspberry Pi Pico packs stayed. Most of the tools stayed, although the thread tapper can hang on the tool wall. The pencils and rulers have another space - a pen pot behind me, so they don’t need to be in the drawer. The hand gel doesn’t need to be there.
The Raspberry Pi Pico’s went into the immediate project space.
This is a lot left, but lets see if this will work. To start the project, I removed the drawer from its runners. I’d already removed the all the contents to make the inventory of it.
Materials
Foam core is sheets of foam sandwiched between a thin material like paper or cardboard. It is easy to cut, but rigid. It comes in different thicknesses. I happened to have 5mm black/grey foamcore in stock. These are in sheets.
I used hot glue to hold it - since foamcore is permeable, it works with hot glue for a pretty strong joint. You do need to hold parts still for a few seconds only.
I was cutting with a craft knife, using a cutting ruler, and some spoilboard (a bit of waste wood - cheap, poor quality ply) under them when cutting. I used a pencil to mark out where I would cut first.
Adam Savage had some great tips on cutting foamcore in the video above, it’s mostly a matter of patience and letting the knife do the work in multiple passes. If you are forcing it and dragging the knife, you’ll get rough cuts. I experimented a bit here to get the technique.
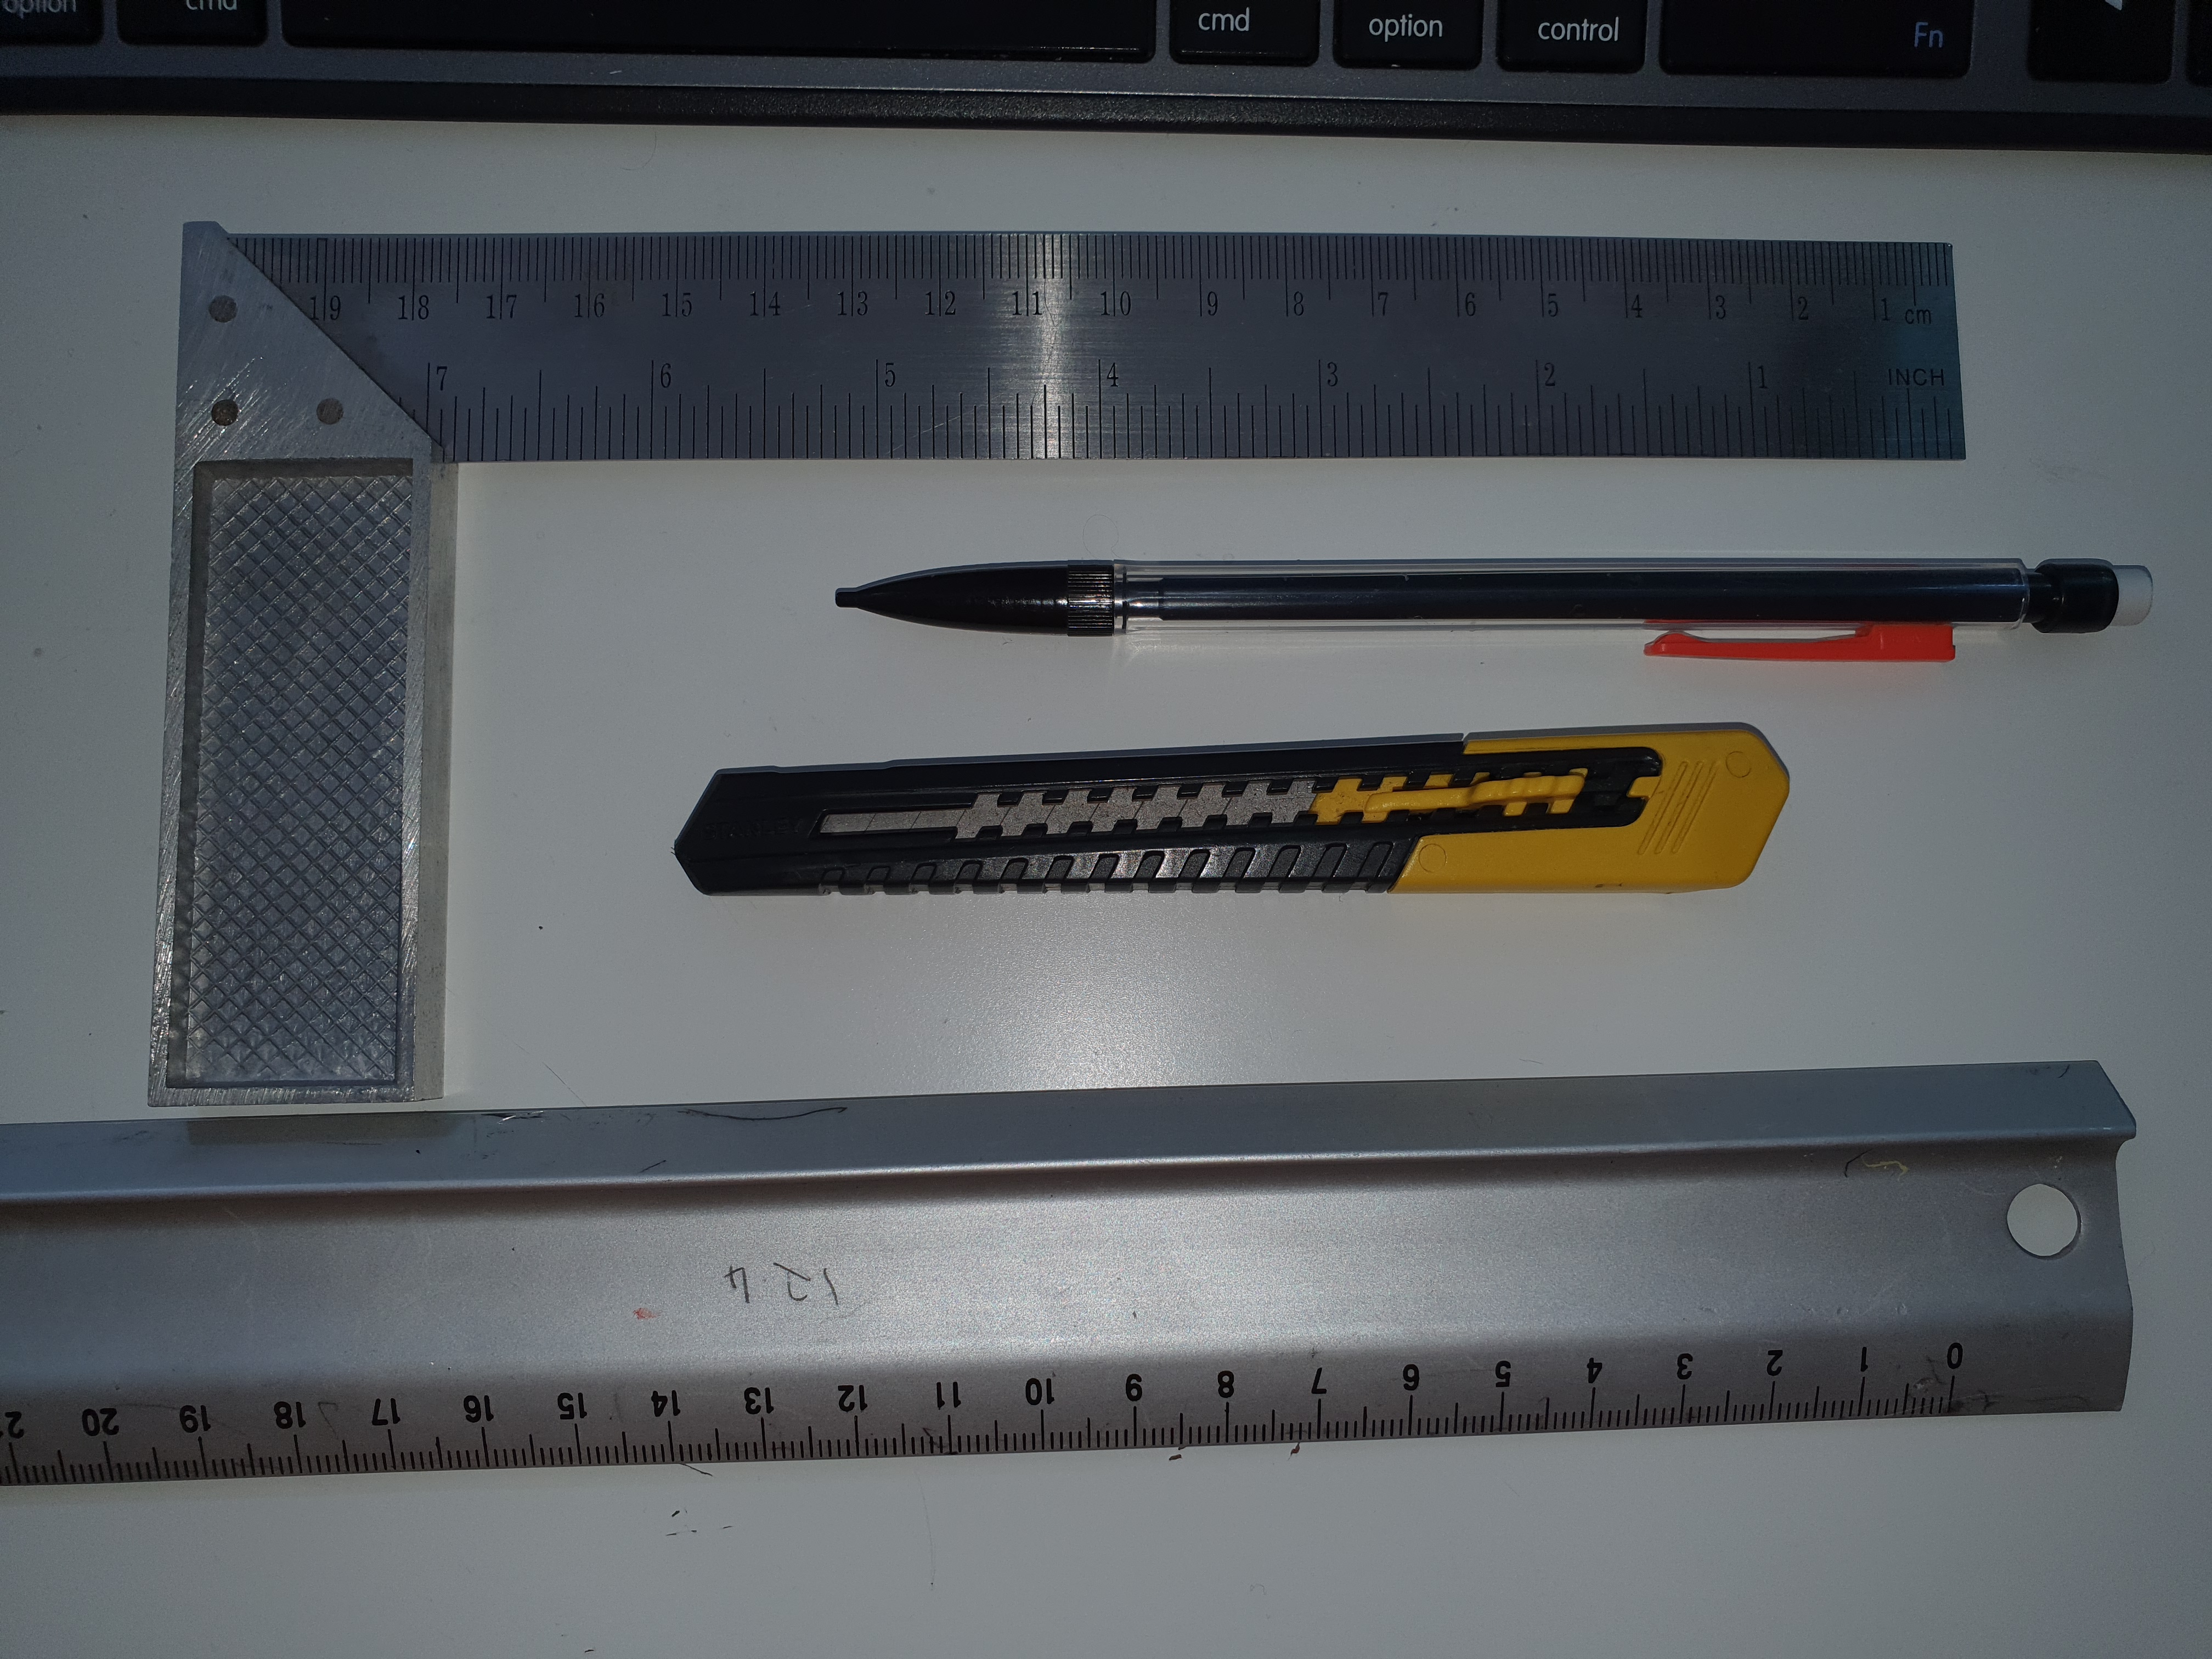
I’ve also been cheeky with this project making real world empirical markings, and not measuring transferring. So I did not use a tape measure or calipers for it. I did use a set square and ruler to get the straight lines for cutting.
First Layer
I thought this would work with 2 levels. So my starting point was to measure up foam core. First I placed a foamcore sheet over the drawer, lining up one of the right angles sides with the internal corner. I used pencil to mark off the other side. This made for the first level.
Here I admit to lying a little, I did used the ruler on the set-square to work out the depth of the drawer. I added the thickness of two foamcore sheets (10mm), and then worked out that the compartment dividers height should be half of what is left. 35mm sounded good - but I then checked that this would be enough for most of the tools. I cut some strips from what was left of this first sheet, to start making dividers. This was the only use of any measurement in this project.
There was an off cut from the strips that was a bit shorter (closer to 25 mm) than the rest. This is still acceptable for divider walls, although not as neat, I chose to use it too.
The first thing to put in were the outer walls. I marked and cut the left and right walls from the sheet directly. I use the hot glue gun to run glue all the way down the edge of them, and held each in place. I then measured up the front and back walls from the gap between the left and right, and glue this in place with glue on the sides as well as the bottom. This quickly made for firm walls.
I then started lining up some of the above inventory on what would be the lower sheet. This sheet would be all tools. I laid these out, knolling them and leaving gaps for the walls. I could then start cutting some pieces of wall to divide them. I started with the largest lengths, glueing those down. This left smaller bits, and I was able to find places to put them.
This process took about an hour. But I began to get quicker at making the cuts, and getting things hot-glued in place. It also seemed to go through hot glue sticks pretty quickly!

Upper Layer
I took a break, and came back for the upper layer. The first thing I did was to try placing the lower layer into the drawer to make space. This too much of a snug fit - I’d not accounted for the screw head protruding from the back of the drawer handle. I had to slice of some of the excess hot glue, and slightly trim the foam to the sides. I now got the first layer in.
With this in mind, I started measuring the base for the second layer. I left a bit more slack in the sides, and left a few additional millimetres for the screw head.
The rest fo the process was much like the first layer, knolling out the drawer contents, then placing walls around them. I got a little more ambitious here - going for the 45 degree wall for the Octosnap. The rest of the compartments are still rectangles though.
This took another 45 minutes to cut, place and then glue the parts together.
Conclusion
I’ve put both drawers in place - and I’m quite happy with the results. I may refine it and change parts, but I also have other drawers, which i use less often, that I could apply this technique too. Even some of the storage bins could be improved - perhaps I could use plasticard instead of foamcore for smaller spaces. With storage bins - their taper tends to make cutting dividers more complicated though.
I am pleased with this project, and I’ll be making use of this drawer daily.